Jewelry photography Tips: How to improve your website photography | Professional Jewelry Photographer Kate Benson

You have just taken the first step in elevating your jewelry photography. Hopefully you will find some of these jewelry photography tips helpful.

They were written to speak to a wide audience so feel free to skip around if you like!

With your jewelry photography, you may be doing it yourself, or working with a photographer and not getting what you want. To get started, here is is a video of what a lot of jewelry photography looks like (although not how all professionals do it) and some of you may watch this video and say, “I would be happy with jewelry photography like that!” while others have had photography like that and are looking to elevate it.


Regardless of your situation, there are ways to help improve your images. You’ve put a lot of time and energy into designing your pieces, and you want your jewelry photographs to reflect that! Here are 8 tips from a professional jewelry photographer to help elevate your photos.


Tip 1: Have Your Pieces Professionally Polished and Cleaned

Before you bring your jewelry pieces to a photoshoot, make sure to get them professionally polished and cleaned. This will elevate your images because they will look almost new and flawless. When looking at a jewelry image, the camera is much closer to the piece than the naked eye would be. This means the image will show any scratches or flaws in the jewelry that otherwise would not be noticeable. Many of these blemishes a professional photographer can edit out in post production. However, keep in mind that your photograph cost is equal to how much time is spent on your products. If a photographer needs to spend a few hours retouching your images, then your per image rate will be more expensive than if you had your pieces cleaned and the photographer had few corrections to make.

Professional jewelers will be able to polish your jewelry and remove most scratches, too.


For example, when jewelry photographer Kate Benson worked with estate fine jewelry for Fine Art Auctions Miami, they would have their pieces professionally polished and cleaned before each shoot. These were mostly worn pieces from private collections. This helped to elevate their images as the product looked as good as it was going to before she photographed it. The images were requested to not be deeply retouched as the buyers needed to see the real state of the jewelry. So getting it well cleaned and polished was critical!

Tip 2: Don’t Wear Jewelry You Want Photographed Before a Photoshoot

Staying along the lines of getting your jewelry professionally polished and clean, is not to wear any jewelry you want photographed. It is tempting when you create a beautiful piece and have the chance to enjoy it yourself to put it on. However, wearing jewelry before the photoshoot exposes the pieces to risk that isn’t needed such as, scratching the pieces, fingerprints, dusts, etc. All of that will increase the likelihood of the pieces needing to be cleaned professionally or be subjected to more retouching. 

If you are looking to clean your jewelry yourself, here is a video taking you step by step. Note: This process will not help to remove scratches.

Tip 3: Review and Carefully Select the Pieces You are Going to Shoot.

Manufacturing defects can happen. When picking out which pieces to photograph, check for everything. Some of the common issues that come through photography studios are: 

  • Crooked jump rings
  • Loose stones that can fall out
  • Scratches or dents
  • Broken clasps
  • Inconsistent assembly of pieces (for example, logo tags changing the sides of the pieces they are on).

By taking a close look at your jewelry and confirming the pieces are in the best shape possible you will save on retouching time. If you are working with a photographer, send more than one piece of the same jewelry to the shoot, so the photographer can pick out the best looking one.

Tip 4: Plan Art Direction for Each Image You Need Before Your Shoot

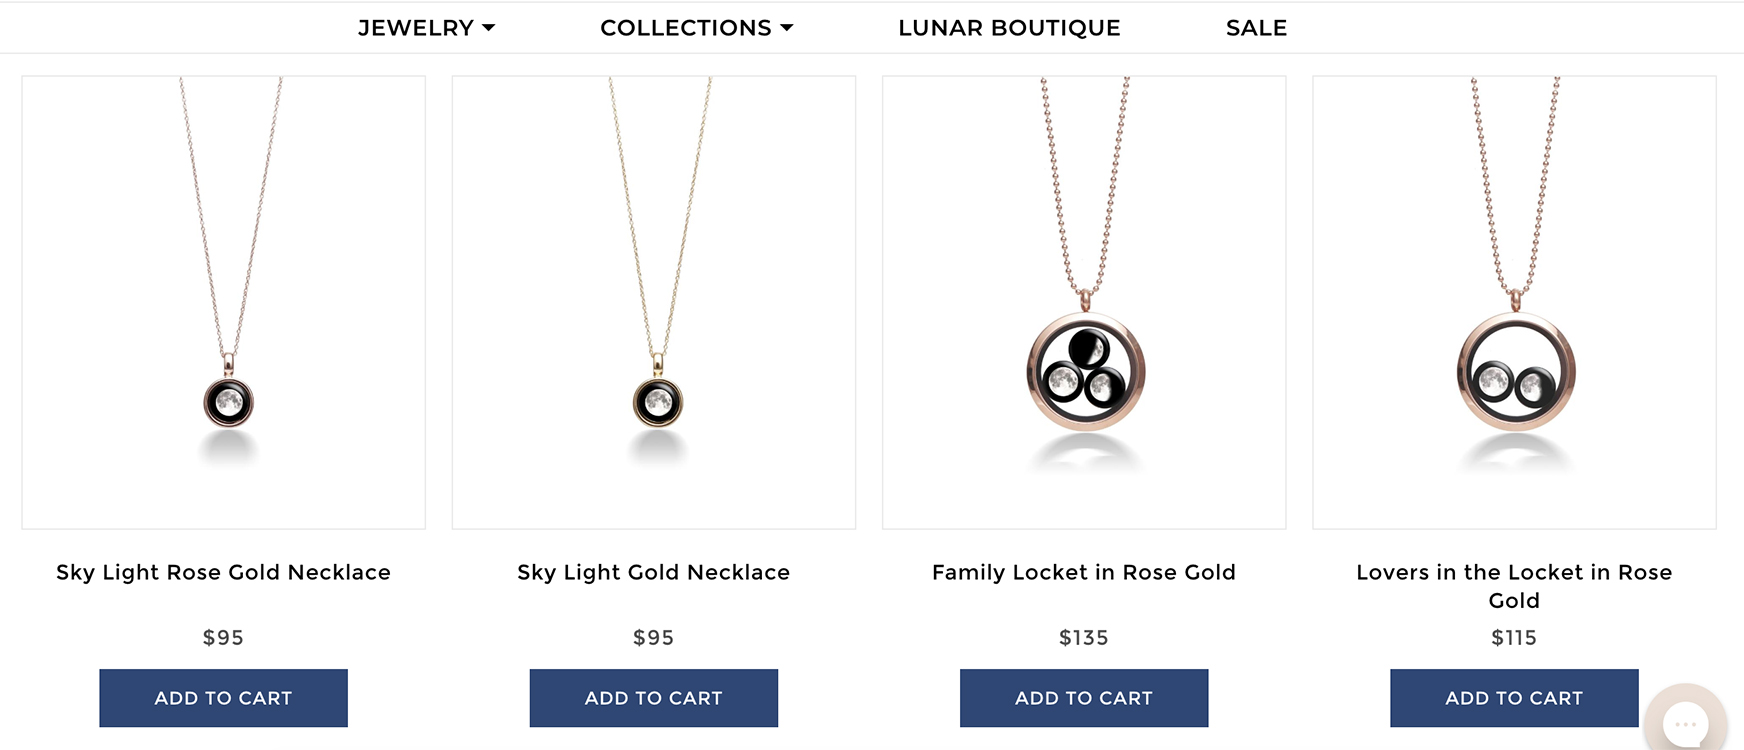
Whether you are building a website from scratch or creating an ad campaign, plan out every shot you need before shooting and make sure your pieces work for that shot. This is more important if you are working with a photographer but having things mapped out keeps each angle of each style piece consistent to how you want it to be. When putting images on a website you don’t want the angles of jewelry to shift. You want the website to look consistent and seamless. Having these guides will keep you from shifting what the images look like. 

If you are working with a photographer, letting the jewelry photographer know what you want is crucial to getting the photographs you need. Map out with images (either through testing with your photographer or collection inspiration on you own) what images you like. The photographer will want a guide of how you want each shot she/he is taking to look (roughly). From there, jewelry photographers can have a place to start and offer suggestions of alternative options for lighting, angles, etc. where they see something might work better. Most photographers expect to have a conversation about this before the shoot. During that conversation, consider that a jewelry photographer has seen a lot of product like yours before and has an idea already of why some pictures work better than others. Take long chain necklaces for example. How far do you zoom out for your image to show such a large piece? Too far will not show the details of the necklace. A jewelry photographer might suggest either including a zoom feature on your website so customers can see those details clearly, or to add detail shots as secondary images of your piece.

Keep an eye out for future blog posts on how to create moodboards and shot lists for art direction.

Tip 5: Keep it Consistent

Regardless of if you are shooting yourself or a professional jewelry photographer is, use a tripod and make sure the jewelry isn’t shifting/moving around when it is photographed. For example, hanging necklaces might sway for a while, so either place something behind them or wait until they stop moving before shooting. Regardless of if you are using natural light or not, make notes about what the light values were. If you have studio lights, write down their values, positions, and modifiers. If you are shooting in natural light, record the time of day, the weather, etc. Light will change color when it is cloudy or sunny. You want to be able if you are shooting yourself to go back and recreate the setup you have next time you have new pieces to shoot.

If you have a professional jewelry photographer, confirm that he/she is taking steps to recreate your setup when you have more product ready to send. Product photographer Kate Benson had this to say on this topic, “Consistency is one of the reasons I don’t often select to shoot product in natural light. It can be a beautiful atheistic but after spending a decade working in South Florida where the weather changes constantly chasing the light values, temperatures, and adjusting modifiers to correct for clouds/sun slowed down work and created too many variables and hence, inconsistencies. I prefer to create natural light in studio now when clients want that look.”  She explained that each client has their setups and lighting recorded through pictures and charts so whenever they send product again it will look like it was shot at the exact same time once it is on the website.

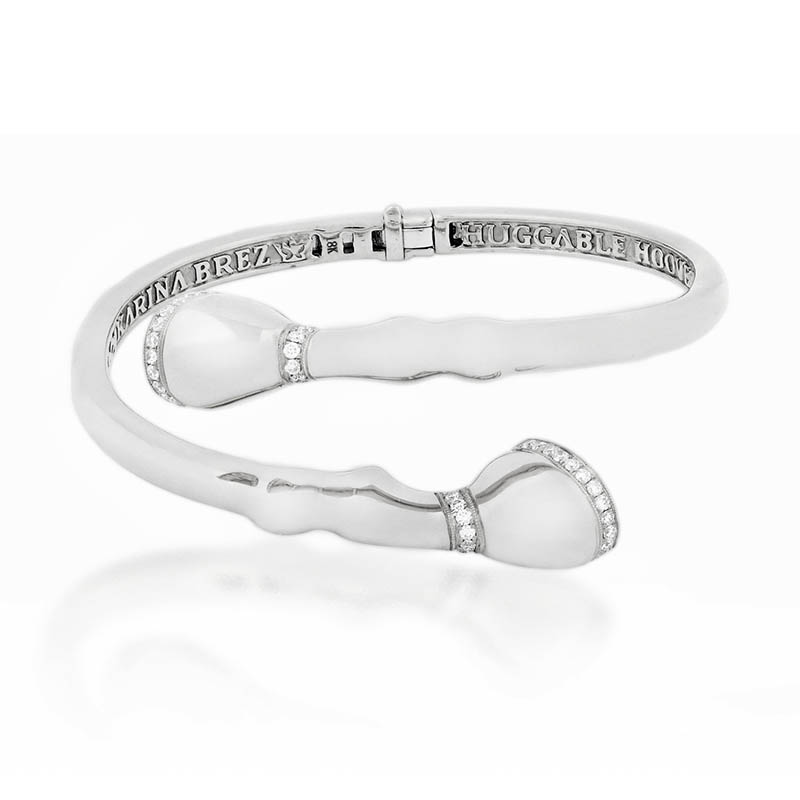
Tip 6: Matte vs. Shine

Jewelry is a finicky product to shoot. It acts like a mirror, reflecting everything. So what is reflecting in the metal is as important as what isn’t reflecting. Obviously you don’t want to see the yourself/the photographer and camera or objects from around a room in your jewelry but you may need to see something reflecting in the metal to make sure it looks right. If you have a matte finish on your jewelry you can get away with a lot more but when the jewelry has a shiny reflective finish then not seeing the right thing will look matte. Knowing how to put the right reflections into metal could make or break your sales + returns. If customers think they are buying a matte finish piece and get something shiny they could be very unhappy. So being accurate is very important. Pay close attention to what the jewelry looks like in your setup. You may need to add some reflections to make it look right!

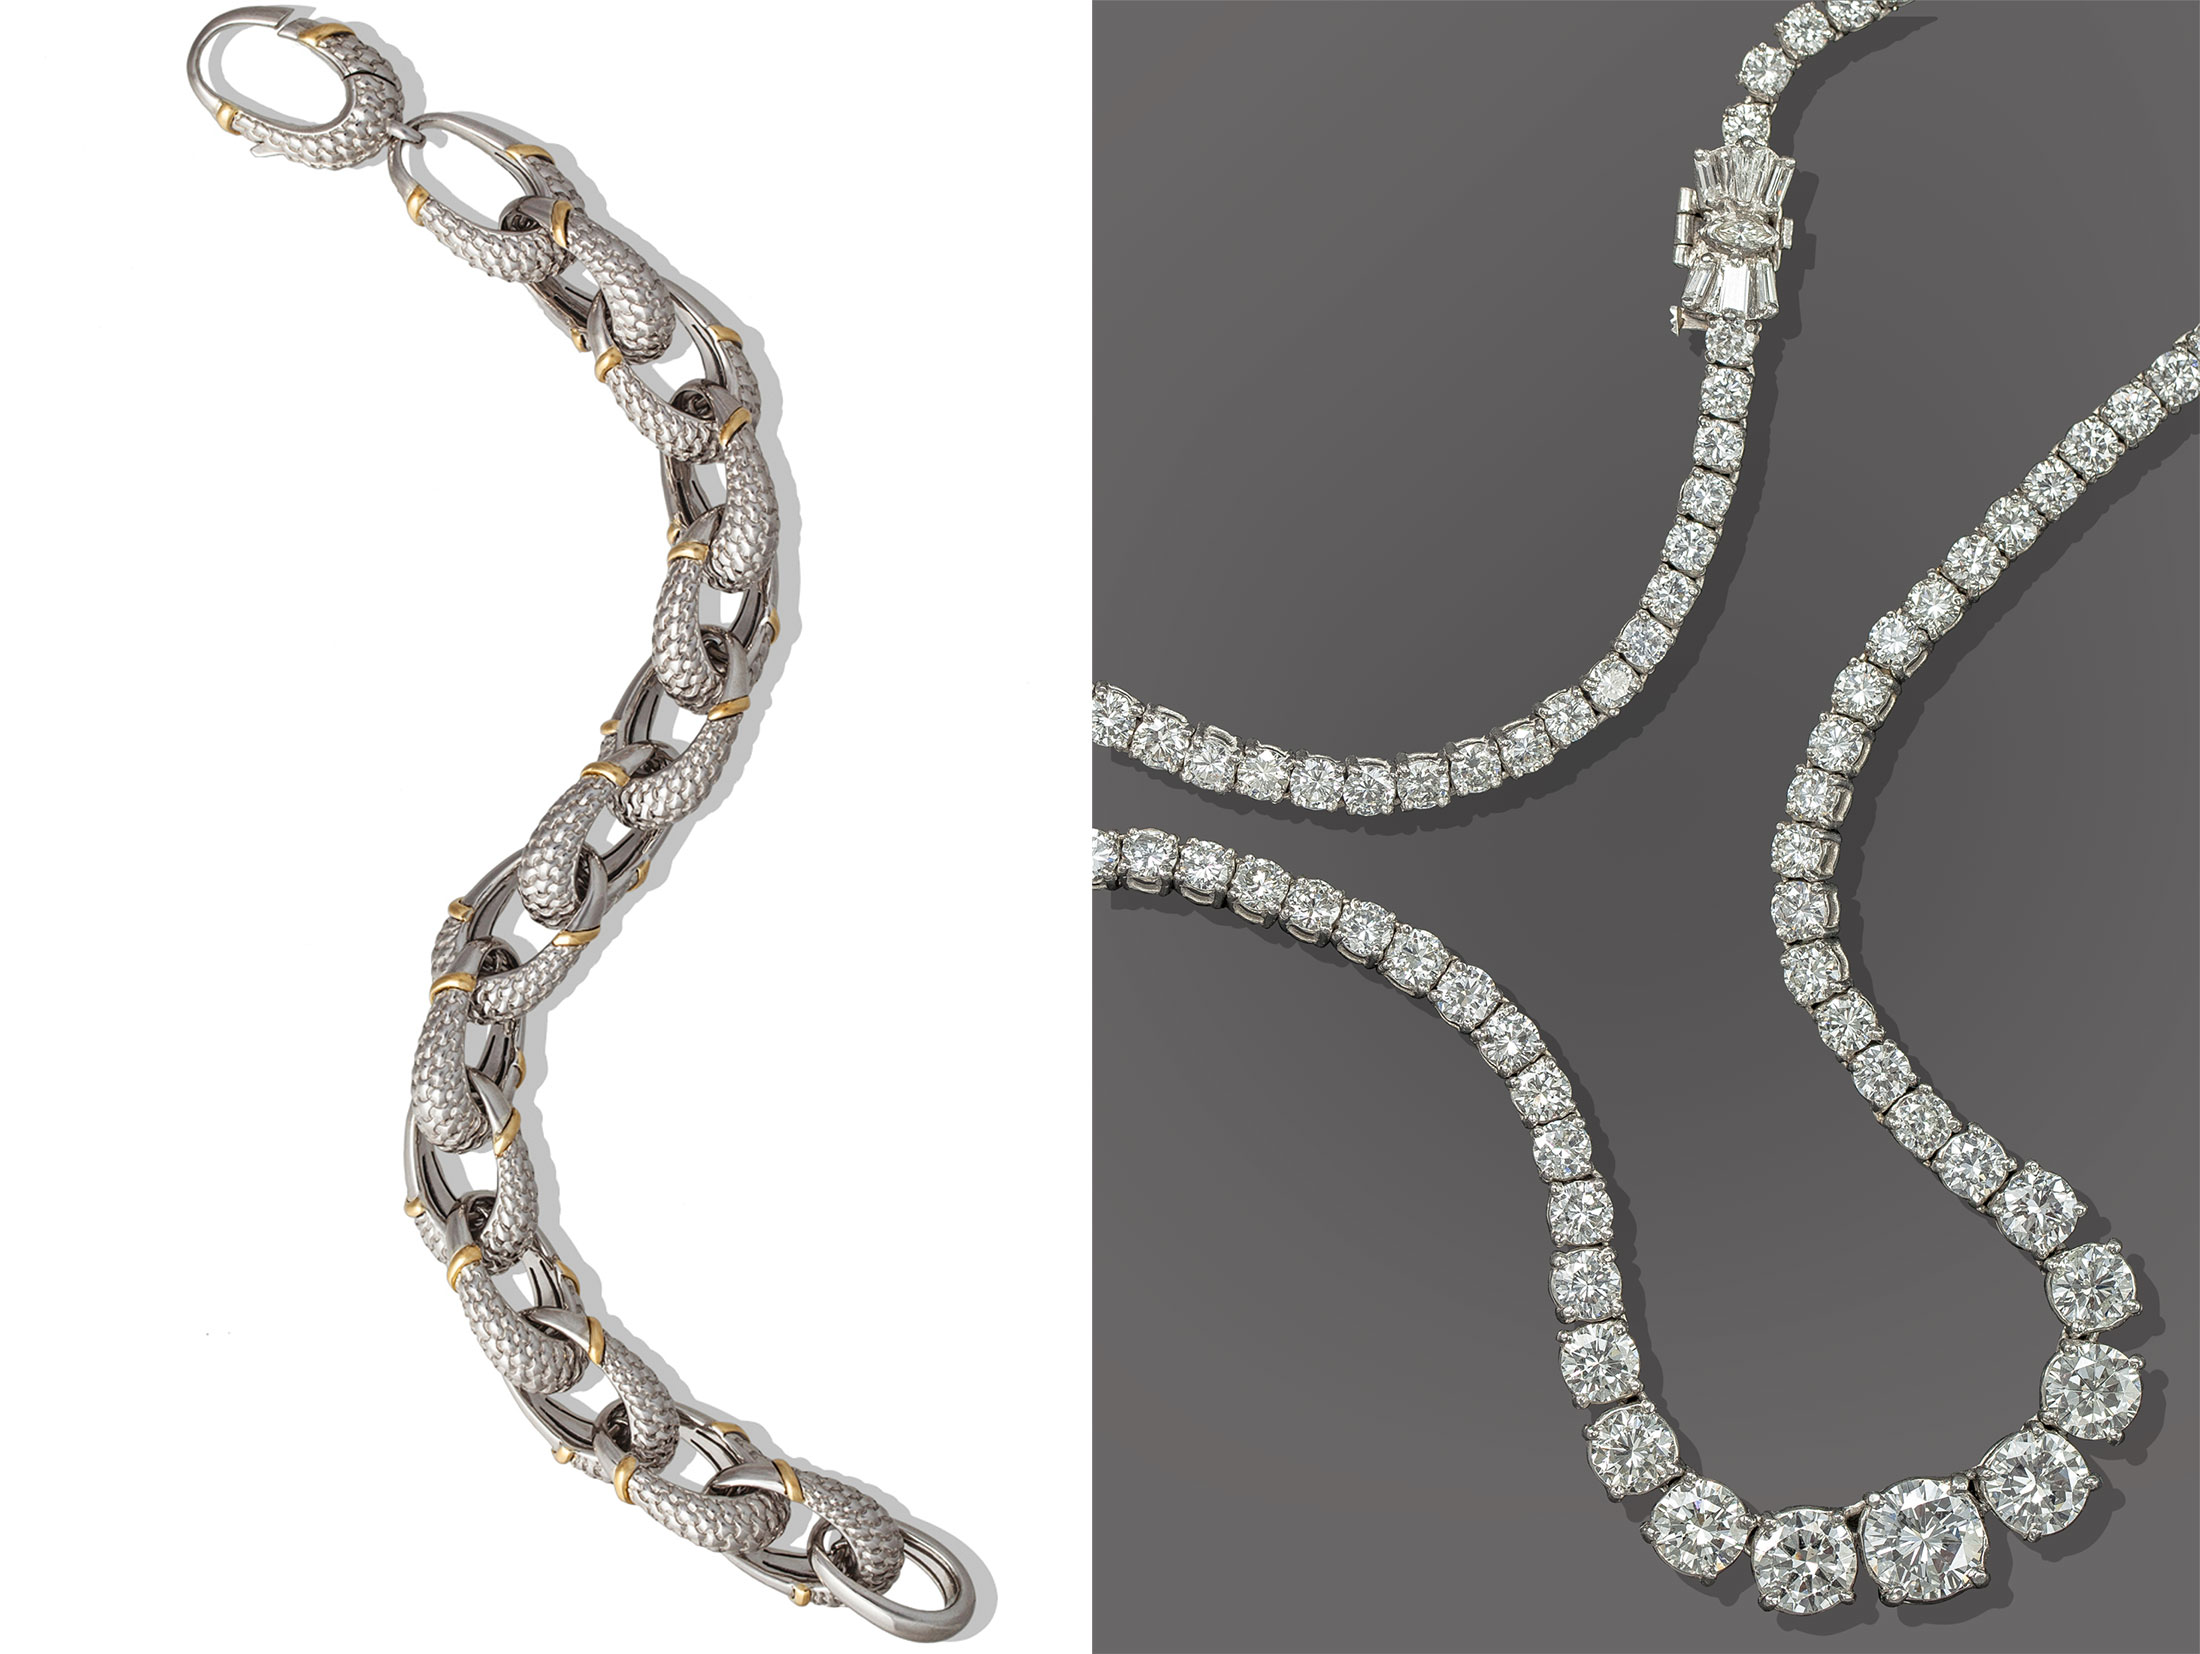
Let’s revisit the first video about taking photographs using a light tent. A light tent is a great way to minimize any reflections. Your jewelry will be surrounded by plain white fabric on all sides, with the exception of a camera hole. The only reflection you’ll have is from your camera. It sounds counterintuitive, but the problem with a light tent is that you have no reflections. This gives jewelry a matte look, instead of the shine that looks great and gives pieces shape. Jewelry photographer Kate Benson has been shooting jewelry for over a decade, and she uses a variety of papers, scrims, modifiers, and lights (and almost never a light tent) to make the setup completely adjustable for each piece as necessary. “I have better control over the reflections in each jewelry piece this way. If I’m shooting rings that are different sizes, I can make small tweaks in the lighting setup to make each piece look its best. If I just put one on after the other, and didn’t make any adjustments, the reflections could look wrong.” Here’s an example of a piece of jewelry shot in a light box versus a controlled studio setup.

Bracelet shot using a light box by anonymous photographer

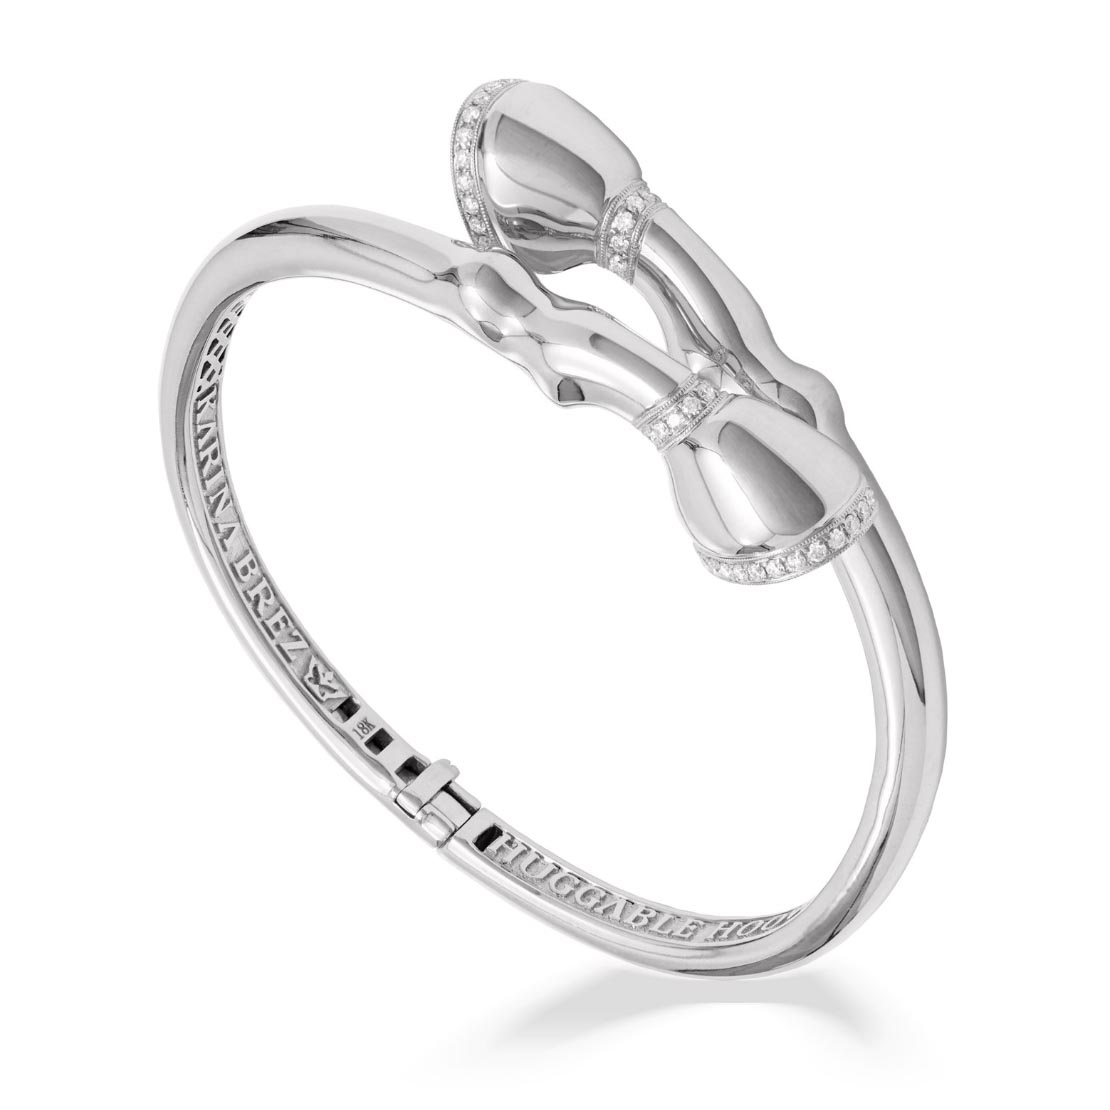
Bracelet shot in studio with a custom lighting setup by Kate Benson

Tip 7: Test it Out

There is a rumor that Vogue Magazine makes 5 different covers for every issue and then sends those covers out to a group of design talented beta viewers who will vote for the cover they like best. Regardless if that is true or not, that concept is a great way to elevate your jewelry photography. Whether you plan on using the photographs on your website, in mailers, or for banners and billboards, creating a few different mockup versions and seeing which ones look the best is sure to improve your photography usage. If you have a single piece, try seeing if your jewelry photographer offers a test shoot option where you can hire her/him to explore a few different photographic options to see what works the best. 

Tip 8: When in Doubt, Hire a Professional Jewelry Photographer

This is probably the fastest way to improve your jewelry photography. Keep in mind, hiring a professional photographer is not the same thing as a professional jewelry photographer. True jewelry photographers will pay close attention to what your jewelry is, what it needs to look like, and will make sure it all translates beautifully in the photography. You can estimate the per shot rate from a professional jewelry photographer in the range of $30 – $80+, which is extremely dependent on what type of jewelry you have, and how many pieces. If you have a ring that you sell with different colored stones on it, it might be possible to recolor the stones, and you might be looking toward the $30 range. If you have fine jewelry that needs a specific lighting setup per piece, you are looking at the higher end of the spectrum. Jewelry photographer Kate Benson recently did a shoot for a client with a high volume of images needed for the brands website and Amazon and was able to get the photography for under $20 a shot with testing because the volume was so high.

Many professional jewelry photographers will not give you this per image rate, but instead quote you based on an hourly or day rate. This way, they have the time they need to get your pieces to look stunning. A lot of work goes into a jewelry photo, including initial prep (like extra polishing), styling (especially difficult with chains), test shooting (if you needed it ), shooting (and lighting adjustments as needed), then retouching. If you receive a per shot rate, confirm that you know the final photography you are getting includes all the elements you need. Make sure every part of the shoot is spelled out before they do the work for you. The last think you want is to hire someone to do a shoot for you and then realize you needed background cleanup, more retouching, clipping paths, custom file sizes, etc. If you hire an hourly rate photographer you can always go back and ask for these things and they can invoice for them after but if you have a per shot rate this might not be included. Over communicating to the photographer is better than under communicating! It takes time but is worth it to avoid any issues later!

In conclusion

There are many factors that can increase your chances of getting the best jewelry photography for your brand. Be confident in what you decide to do and remember that if you try one way and it doesn’t work, you can try something else. Leave any questions you have in the comments and Kate Benson will get back to you ASAP!

Best E-commerce + website photography strategies by e-commerce website photographer Kate Benson

When building an e-commerce website you are creating an online store. Everything that goes into the site needs to be intentional and knowledgeable. From the template you use, to the tone of your text, through the e-commerce and website photography, everything should be on brand and working for you. This article will focus on how to get the most out of your website photography, what to consider, and whether you do it yourself or use an e-commerce website photographer.


How does website e-commerce photography affect your SEO?

Search engine optimization (SEO) should be on your mind in everything while building your website. Often times people overlook that your e-commerce and website photography is an opportunity to increase the SEO on your site. From website photographer Kate Benson: “I offer to give the pictures I take custom image names and keywords so they show up in Google (and other search engine) image searches which not only increases the SEO on the customers website, but also let’s buyers who use image searches to shop find the product faster”.

To utilize this opportunity for SEO, selecting the right website building platform is critical. “Make sure you select to build your website on a platform that doesn’t rename your image files, that way those custom image names are used”. Squarespace for example has been known to rename images when they are resized to fit into the templates. So although the websites are beautiful, it might not be the best choice if you want to utilize this aspect of SEO. Kate is a big advocate for using WordPress themes with plugins that are really flexible so you can design them to look like anything you want. “My favorite WordPress theme is Divi by Elegant Themes. I’ve been recommending clients to it because it lets you have control over all the design elements, it is responsive, and has lots of opportunities for SEO in images. Google (my search engine of choice) reads these websites really well.” 

Creating customer trust through consistency in your website photography.

Forbes.com recommends looking at your website as a user. They shared this quote:

Users see what owners don’t. A way to shed light to owners is to cut through the noise and give the users three firm things clearly and efficiently: What your service or product does, examples of what you do, and why they should trust your brand. Presenting content that follows the form after function rule will yield the best impact. Don’t underestimate the power of visual design as a differentiator.   – Lee SalisburyUnitOneNine

If your photography is all over the place and inconsistent, it can create distrust for a buyer. Photography that feels like it goes together and flows from image to image but still clearly tells the buyer about the product is the goal for good website photography. This doesn’t mean every picture must match, although many websites do prefer that formula, but they need to make sense together and all be on brand.

E-commerce website photographer Kate Benson describes this more. “I’ve had clients want everything from white background shots that are almost CGI (computer generate imagery) to every photo different in a new location on a model in environments. I’ve seen that both can work as long as you know your target market. Choosing the wrong type of e-commerce photography directly results in loss of sales. That is the last thing clients who work very hard getting customers to their websites need. The photography is the make or break when it comes to selling products online. Doing it with consistency (knowing what your lighting, compositions, crops and angles will be) over and over regardless of when the product was manufactured and the photoshoot is builds buyer trust and creates repeat customers. Once I get art direction locked in from a client, I record everything, how high was the tripod, how many lights, what modifiers, how far were they from the product, etc. That way the next time we work together the images can look like they were taken at the same time as the last shoot.”

Should you hire an e-commerce website photographer?

Hiring a professional e-commerce + website photographer can be a huge advantage if you hire the right one. It’s important that there is a good relationship between you and the photographer. You need to be able to trust them to take images you need, but a really good website photographer has other advantages they bring to the table.

“Finding an e-commerce + website photographer who you like is a great accomplishment and can be well worth the investment. A lot of my clients love that I shoot still life, e-commerce and fashion + lifestyle images because whatever they need, I can shoot it for them. Using one photographer can create consistency across websites, social media and all image branding channels and you have the benefit of working with someone you know and trust. Clients who work with me are looking for anything from total image branding to just some extra help when their in house photography teams are overwhelmed. My goal is always to give a client the best images possible and by that, I mean images that sell!” – e-commerce and website photographer Kate Benson.

Getting a great picture is just a small part of what a professional e-commerce and website photographer will do. Find the right person and ideally you’ll get a consultant in there who will work with you to make sure you get images that are consistent, on brand, are clear to the buyer, are accurate to the product (color/shape/etc), are sized in a way to keep your website running fast, and can even increase your SEO. Website photographer Kate Benson explains her process, “It’s not unusual for me to sit down with a client or a client’s website designer before or after I shoot and make sure we are getting all the images on the site correctly and optimized.”

It is very possible to take your own website photography. For people who are interested in learning photography and have the time to dedicate to it, it will save you money. Also people who already know photography can benefit from it. There are articles all over the web that will teach you how to do website photography, and in the right hand, these can be great. Just keep in mind your goals: if you have no real interest, time, or talent for photography, this might not be the place to conserve budget. A great photo of your product will sell more than an okay image. This is also something to consider when looking to hire a student or influencer to create your images. When hiring a professional website photographer, you are paying for someone to meticulously style your product in a set to make it look its best.


How do I find an e-commerce website photographer?

Finding a website photographer doesn’t have to be hard, but doing a bit of work in the beginning can be worth it. Especially if you plan on developing an ongoing relationship with a product photographer as your business and needs grow. A few questions that can get you started with your search for a website photographer are:

  1. Can I mail my product to a photographer?
  2. What is my budget for my photos?
  3. When will my products be ready to be shot?

If your product can be mailed, you are able to search a much larger radius to find your photographer and that opens doors for you. Essentially, anywhere in the world is a possibility, but if you can’t ship your product to a photographer or the shipping costs are prohibitively expensive, you need to search for a local photographer to your area. Since the range of what a photographer charges is infinite, your budget is going to narrow down who you can afford to hire. Lastly, when do you need the photos? A lot of photographers book up in advance so you need to make sure the photographer you choose is available when you need them.

How do you get a quote from an e-commerce website photographer?

After you’ve found an e-commerce website photographer you like, you will need to share with them your vision (or tell them that you need assistance building art direction) for the photographs of your product. Most e-commerce website photographers charge based off time + costs (usage is usually known) and so to build a quote the photographer will need you to share a shot list. WooCommerce explains a shot list as follows:

  • Which products are in the shot.
  • How many pictures of each product (front, front and back, etc).
  • What type of shot it is (e.g., styled, on white, on coffee table, folded or laid out, etc.).
  • Camera angle.
  • Important style or setting actions (e.g., overhead light on / off).
  • Important objects and props to include.

For example, one shot entry on your list could say something like: Sequined Cotton T-Shirt | Front and Back | Closeup | Half Body Mannequin | Style with red jeans and long gold chain with cat charm.

When adding to existing website photography, creating a shot list is easier because the type of shot, camera angle, style + setting actions are all already known. Then a shot list just needs to be which products, how many angles, what important props/objects need to be included.

For clients that already have a website and want to just get help shooting, their current photography can act as a guide. When a client is doing a rebranding or starting up their business, I offer test shoots or to freelance art direct for them if they need some help.” -Kate Benson

Special requirements are a large determining factor in costs. Website and product photographer Kate Benson said “I often leave those off the initial quote. I find that making sure we can cover the base costs (time + team) is the first step. Then depending on the art direction I’ll either send an updated estimate with those costs or refer a set + prop stylist to come on board to help with that. If we do some test shooting or the shot list is really clear and a product I’m familiar with I’ll give a per shot rate to the clients.” Other special requirements could be studio and location rentals or special equipment rentals or rush fees.

How do you know if you’ve found the right website e-commerce photographer?

After you’ve done the work above you may have a list of photographers whose work you love, are in your budget, and available when you need them. That is a great situation! Website e-commerce photography is a big commitment though as changing the way things look down the road may require reshooting everything that you are still selling but have an older photograph for. Talking to the photographer either on the phone or in person is a great first step to feeling out if they connect with you and understand what you need.

E-commerce website photographer Kate Benson has insight on how she builds confidence with her clients about working together. “I offer test shoots. A test shoot is when the client sends me one of each type of product they have and we do a virtual live shoot. After each shot reaches a place I am happy with it, I’ll send them the shot via text or email for their thoughts. This lets the client see exactly what the images will look like when they get them from me. If the client has been struggling to put together art direction, we use a test shoot to explore different angles, lighting and options to find what works best for their product.”

Closing thoughts

Building and maintaining a website is a lot of work. But doing it right has large payoffs and can get you into the statistics of the successful online stores. Hopefully this has taken some of the mystery out of the world of e-commerce website photography.

If you need an e-commerce website photographer and would like more information, or a free quote on your project, feel free to contact Kate Benson Photography.

Good luck with your website!


305-982-7761 | [email protected]

Where?

Location

2 + 6 =

Amazon Product Photographer | Kate Benson | How much does Amazon Photography Cost?

If you can tap into the large customer pool Amazon has, your business could become hugely successful. Because there are so many sellers, though, the competition is high. A key role in setting yourself apart from the rest and attracting customers is your Amazon listing product photography. Many e-commerce shoppers are influenced by product photos. When shopping online, customers cannot physically see or touch your products, so your images speak volumes. One thing I love about Amazon is how fast clients can see a return on investment with their product photography. But that can be daunting to figure out how to do successfully and it comes with a lot of questions. This article hopefully will clear up those questions by talking about how much does Amazon photography cost, what the workflow of working with a professional Amazon photographer is like, and what the benefits of that are.

One thing I love about Amazon is how fast clients can see a return on investment with their product photography.

Amazon has strict guidelines for photography. Different products have different requirements that Amazon spells out in their style guides (scroll down to Resources for some of these). A product photographer will be able to go through the guides and make sure your images meet all the requirements. The last thing you want is to invest time and money into getting your product photography on Amazon and have the website reject your images because they don’t meet the strict requirements.

What is it like to work with a product photographer for my Amazon listing?

Different professional product photographers have different workflows, so I can only really speak to how I work. My goal is to make sure the files delivered match the art direction and are on brand while still meeting Amazon’s guidelines. The photography process varies from client to client, because companies of all sizes sell on Amazon and so the needs and team change accordingly. So whether it’s the photographer, the client or a team doing it, bellow are some of the steps that happen.
  1. Art Direction/Mood Boards: I’ve worked with clients who have professional art directors who send me documents of each shot of the product and the corresponding image examples of what I need to match or exceed. However, I also work with clients who have no idea what art direction is and I help them form that document. The art direction has to be within Amazon’s image requirements which means we don’t have as much flexibility with the primary product shot in terms of background, but the styling, lighting, and propping are all flexible and the art direction tells me the client wants. Another term for art direction is mood board so whatever you call it, it the same thing. By being creative you can draw attention to your product in a sea of similar products. Shooting a glass bottle empty for example wouldn’t draw much attention by itself on a page full of similar empty glass bottles, but filled with bright fruit, herbs or liquid the image stands out from the rest. That is how art direction can help.
  2. Shoot Day: The product usually is shipped to me in my South Carolina studio space where I work remotely with clients all the time. When the client can’t be on set for the shoot day, I make sure the client has access to a computer or phone and when I think I have the shot, I send a preview image for the client to review and approve. That way, clients are still able to participate in the photoshoot and adjust the art direction as their products are shot if they want to. It gives clients confidence that they aren’t purchasing images that won’t work. I don’t want clients to feel like they have to blindly trust me so I offer to make the shoots as interactive as possible regardless of where the companies are based out of.
  3. File Delivery: This can vary. Just because we are shooting for Amazon doesn’t mean every client is going to only use the images I take on Amazon so often clients expect a larger file than Amazon would like so they can have in on hand for other purposes. My default is to give a larger file to the clients and let them make it smaller for Amazon but when a client tells me they want it just Amazon size or two versions (large and small for Amazon) I give it to them that way. Clients can get the files the same day I shoot or up to a week after. It depends on how many shots we are taking and how much retouching is needed. For example, if I’m shooting 100+ items, odds are that most of the day is going to be dedicated to the photographing of the products. But if I’m shooting 1 product I’ll usually have time that same day to do any retouching that is needed and send it over right away.
When I work remotely with clients, they ship their products to my South Carolina studio and include a return label. I can then easily send the products back to them once the shoot is complete.

How much does Amazon photography cost?

Amazon photography cost = Photographer and team time + Expenses

In the field of photography, your rate is equal to how much time it will take to shoot your product, plus any other expenses (like props, a stylist, or models). The most basic Amazon photo (one object on a pure white background) will cost significantly less than an image with people in an environment with your product because we have to make sure that everything in that space looks right (the people, the space, the props in that space, etc). So Amazon photography cost is very dependent on the art direction. Amazon photography cost less than $200 to over $600 depending on how you want it to look. The low end of that Amazon photography cost estimate is the product on a white background by itself (e-commerce image) and the higher end of Amazon photography cost includes props, people, locations, etc. Remember to look at your competition and think about how big do you want your business to go? If you want to be the #1 seller of your product, you need to see what the current #1 seller’s photos look like, check out their descriptions, read their reviews, and then do even better on your listing! By hiring a professional product photographer for Amazon, you can get your images to a competitively high standard while following Amazon’s requirements.

 Amazon photography could cost less than $200 to over $600

If you have the budget, you should consider getting images with your product in an environment or on model if applicable. These lifestyle shots are more sensory, and can help your customers better understand how to use your product, and what it looks/feels like. Lifestyle images often need to budget for props and talent (I will always use whatever I have on hand to keep costs down if it works for the shoot though). In the example below, I used fresh fruits and veggies for styled images as well as a model using the product on location. We also did some plain white background shots of just the product. This shoot was over $600 because it involved so many components. However, the product shot up to the #1 spot after the Amazon listing was updated.

You can also add lifestyle images to the product description. These photos could help break up larger sections of text, and can enhance your listing through even more additional views and details. Having these types of secondary pictures in the product description is another way to stand apart in the competitive market on Amazon. 

How can I minimize my Amazon photography cost when I have a small budget?

It might sound counterintuitive, but the best way to minimize your Amazon photography cost is to tell your product photographer what you’re looking for and what your budget is. For reference, I don’t just take a picture, I care about the why and the what behind each shoot. I want my clients to get images to help their businesses grow, and if I succeed, they’ll come back needing more. If I know your budget ahead of time, I can consult with you to see how we can achieve the images you’re looking for based on that limit.

When the budgets are really tight, it can be worth it to start small and work your way up. Getting a few images that look amazing on your listing will help more than a bunch of images that are just okay. Unflattering pictures of your product can hurt your sales by turning a customer away so I recommend taking the less is more approach in those cases.

Lower the Amazon photography cost by telling your product photographer what you’re looking for and what your budget is.

A large part of the Amazon photography cost is the studio lighting setup and breakdown, as that is a time consuming process. I try and help everyone who reaches out to me. When someone reaches out and the budget is really tight, but they can wait a bit for the images I’ll wait and shoot the project until the next time I have an Amazon client. This move splits the setup and breakdown costs between two clients and saves them both money.

What are some general Amazon image requirements?

According to Amazon’s Product image requirements page (you need to log in to your Amazon account to view it):

  • Primary product images must be on a pure white background
  • Images should be between 1,000 and 10,000 pixels on the longest side
  • Preferred image file format is .JPEG
  • Products should occupy 85% of the frame on limiting dimension of longest side
  • Images must not be blurry, pixelated, or have jagged edges


Final Thoughts

Selling on Amazon is a great way to increase your e-commerce revenues. Working with so many different brands and clients for over a decade on Amazon photography has given me a chance to learn about what works and what doesn’t. Clients that hired me attended Amazon selling seminars, beta test their images, etc. and have talked to me about what works, what didn’t, and why. This has put me in a unique position to know a lot about how to optimize images for the best return on investment through Amazon. I hope some of this article has been helpful for you whatever size company you have!

If you need an Amazon photographer and would like more information, or a free quote on your project, feel free to contact me through Kate Benson Photography.

Good luck with your Amazon business!

Connect with Kate:

3 + 7 =

How much does a Jewelry Photographer Cost?

If you’re looking for a professional jewelry photographer, this article is for you.

I’m Chelsea Lister, a Charleston area website builder, and the more complicated websites I build are for jewelry clients. There is a lot of work that goes into the images for your website as that is where you are going to either land a sale, or a customer is leaving the page. Jewelry photography takes a lot of time and planning if done right and I wanted to understand how this time gets reflected in the client’s cost. I spoke with professional jewelry photographer Kate Benson for a better idea. There are a variety of images styles you can take for jewelry, but I’m going to focus on e-commerce website images. These images are extremely important, because they are your first impression to your customers. If you don’t catch their attention now, there’s risk of loosing sales. Think of it like real estate photography. You want to go see the home with the beautiful lighting and bright, full-frame images that capture the architecture and space. Not the house with cropped room pictures that are too dark to see in. Jewelry photography is the same. You want it perfectly lit, in focus, and captivating to your customers. But jewelry is one of the hardest products to shoot. You need to make sure it’s done right. Why hire a professional jewelry photographer With all the tools at our disposal, it’s tempting to try to cut costs for photography. You can easily search for DIY tutorials, order your own equipment, or compare quotes between photographers to find the cheapest rate. The difference is that a professional jewelry photographer will make your piece look stunning, and go above and beyond your expectations. You’ve invested in your jewelry, so you should invest in excellent photography that will be true to your products. Having build websites for clients who went both paths, the websites that invested in their product photography out sell (by a lot) those who don’t. If you get quotes from multiple photographers, make sure you compare apples to apples. If it seems too good to be true, it probably is. “Know what you’re paying for. I always include overhead,” said Kate. She also adds other anticipated costs in her quotes, but not everyone includes extra fees. One way to understand what the quote includes is to ask to see an example of what the jewelry images will look like at that lower cost.  Another reason to hire a professional jewelry photographer is because they want you to be successful. One of the reason’s I like working with Kate is that I often hear her offering suggestions to clients about different ways to photograph a piece, or other angles to consider taking. Professionals photographers have also seen what sells and what doesn’t. It might make costs a little higher, but having a photographer who is also a consultant can be huge. They’ll be able to guide you because they’ve done this many times before.  A big consideration to hiring a professional, but not the most obvious, is repetition. If you continue to work with the same photographer, your images will stay consistent from shoot to shoot. For example, Kate showed me some of her studio notes. For each client she records all the values for the lighting, studio setup, and camera, notes about the post processing, and pictures of the studio. These details allow her images to look the same whether they were shot back to back, or 6 months apart. And with the complicated setup for jewelry, these notes are critical. By paying more for a professional jewelry photographer, you know you’re working with someone who knows that they’re doing. They are careful and precise in their work. The cost of hiring a professional jewelry photographer The cost of jewelry photography varies widely, and can run anywhere from $10 to $2,500+ per image (especially when you factor in shots on models which include a lot of other team to product), which is a pretty big range. There are many contributing factors for your per image cost. Kate focuses on four main variables.
  1. Quantity of images
  2. Art Direction
  3. Availability 
  4. Quality of the Jewelry
In general, photographers essentially charge based on time + costs + usage (which is minimal for website photography). The more shots you want, the more time the photographer needs to shoot, so the larger the overall estimate. Make sure your estimate includes overhead fees like the time it takes for the lighting setups. To get a good base for comparison, take the quote you get after adding all of these items together and dividing it by the number of products you want shot to get a cost per shot. The more jewelry pieces you have and shots you need the higher the estimate total but the lower the per image cost will be. One way Kate minimizes costs is to be efficient. She organizes the jewelry, and shoots everything that requires the same setup, trying not to move the lights until she has to (as changing the setups increases the overall time spent shooting and raises the costs). She gave me a great example of how important quantity can be toward your end jewelry photography costs. One of her clients gave her a few jewelry pieces to shoot, and Kate sent them under 15 files, at a per image rate just below $60 each. For a later shoot, that same client Kate sent over 150 files, and the per image rate was under $30 each. It’s best to send large quantities of your jewelry over to a professional photographer at a time, to minimize your costs throughout the year. According to Kate, the largest deciding factor in cost is art direction. This variable dictates exactly what the photographer needs to do. What you want your jewelry to look like will depend on many costly options. For example,
  • Do you want your product on a plain background, or on model?
    • Models can significantly increase your costs. Not only do you need to pay for the model, but also depending on the shot you’re looking for, you might need a hair and makeup artist, and/or a stylist, and possibly a location.
  • Do you want reflections under the jewelry, shadows, or neither?
  • How many shots are you looking for?
    • Each angle of a piece of jewelry is one shot
    • Multiple pieces of jewelry in one shot would still be one shot but the cost for that shot could be higher since it has more time to style and more pieces to retouch.
    • Details/closeups of jewelry are also one shot
  • Do you want to use any props?
    • Depending on the props, this might be an insignificant charge, or huge
As you can see, there are many cost factors that a photographer can determine from receiving art direction from you. An example of good art direction is this image: The availability of everyone involved will also determine your image cost. Sometimes, you needed your jewelry images yesterday and want to get them rushed. In most cases, there’s a large rush fee. When I found out about how Kate accommodates a rush job request, I thought it was really well-put. I wish I had thought of it. Instead of you paying a “rush fee” and pushing another client’s work to the side, you pay for Kate to either work overtime, or get an extra set of hands to help finish the projects before you. That way, all of her clients still get the images they need on time, but you got yours faster than typical. I know, because I’ve occasionally asked for her to rush shoots for my clients.  The last major cost factor Kate mentioned is the quality of the jewelry. When a professional jewelry photographer is trying to make a piece look as good as possible, there might be additional production necessary. Extra retouching could be needed if the jewelry being shot are samples that show signs of handling. Those pieces might need additional retouching to make sure any flaws that are not representative of the actual product are not present. Fine jewelry might need extra time in setting up the shooting space if the product has insurance requirements that restrict where it can be shot. Overall, if you have a very simple setup, where the lighting doesn’t need to change, and the products are all shot at the same angle, your setup costs will be broken down into your per image shot. And that will be much cheaper.  How you can minimize your costs You want to hire a professional jewelry photographer, but it’s still a little too expensive. Is there anything else you can do to minimize the costs? Yes, because remember: time and cost go hand in hand with photographers. The quicker they can shoot your jewelry, the less it will cost. First, treat your jewelry as if you are getting ready to hand them to a customer. Make sure to polish them before giving them to the photographer. If they’re used, such as antiques or auction pieces, it’s best to get them professionally polished. Having the pieces ready for the shoot means the photographer doesn’t have to spend much time polishing and cleaning the jewelry when it arrives, they can quickly move from piece to piece during shooting, and it minimizes the time it takes to retouch the pieces in post production. And the less time the photographer needs for your shoot, the less expensive the invoice. Another way you can lower your costs is by recoloring. If you have the exact same jewelry piece (including chains, if applicable) in gold, rose gold, and silver, or if you have the same piece with different fine stones, a professional photographer like Kate can often recolor the images for you. First, they style one of the pieces and take the image. Next, they take images of the other pieces for a color reference (no styling necessary). Then, after retouching the styled jewelry, the photographer can go and recolor it using the references from the other jewelry images. This process saves time because the color references are not styled, and the photographer only needs to Photoshop (retouch) one file (the styled jewelry piece). For example, Kate recolored some fine stones for a client, and the cost per image was under $3 each file.  If you’re in love with a jewelry photographer’s work, but don’t need to have them on location, you might be able to mail them your pieces. This will save you the photographer’s travel expenses. When Kate handles jewelry that was shipped to her, she offers to do test shoots to make sure the images are what the client wants, or live previews where the client can receive the images in realtime and make any necessary corrections to the art direction. She might also offer the option to hire her for an hourly rate. So, if you’re looking to work with a jewelry e-commerce photographer, shipping might be the best way to save some money. The price difference between everyday and fine jewelry Being able to ship your jewelry is dependent on what you carry. If you sell everyday jewelry, your overhead costs will probably be lower, and you can ship your jewelry to the photographer to save travel expenses. However, if you sell fine jewelry, there are strict insurance regulations. Jewelry is a unique product in this regulation, so your photographer will have to come to you. When I asked Kate how she handles fine jewelry, she said she travels all over the country to shoot for clients. One of her favorite shoots was in a vault, where she had to go through extensive security before being able to see the piece she was photographing and bring in battery packs for all her lighting. Final thoughts Hiring a professional jewelry photographer for your e-commerce website will help you in the long run. You are hiring a photographer who not only knows how to make your jewelry look stunning, but also acts as a consultant who knows what works and what doesn’t, and who can give suggestions to enhance your brand. It is worth the cost, but there are certainly some ways to help lower your per image rate.  If you are looking for a professional jewelry photographer and would like more information, or a free quote on your project, contact Kate Benson Photography. Good luck with your e-commerce website! Chelsea

Connect with Kate:

2 + 4 =

Subscribe To Our Newsletter

Join our mailing list to receive the latest news and updates from our team.

You have Successfully Subscribed!