AI laws For CA and NY
Is AI already on it’s way out?
Ai laws for Ny & CA
I wish I could say I kept my finger on the pulse of current news, but I don’t. At the end of the day, I’m ready to get into my pajamas and bathrobe with a great book and let my brain take a pause.
So today, during an intro chat with someone who is looking for a shoot, imagine my surprise when he mentioned part of his reasoning for the shoot steamed from laws being passed regulating the identification of AI imagery.
I don’t think I need to embrace AI or risk becoming irrelevant nor fight AI tooth and nail. I’ve been keeping an eye on it, dabbling in it, learning its strengths and weaknesses, and creating however it makes sense to the clients.
As you’ve seen on my website, some 5-10 second videos are popping up in my portfolio that I’ve used AI to help me create from my work. Honestly, I’ve enjoyed creating these and it’s been a cost effective option for my clients who couldn’t get video on set. As a still image creator, I have motion I’d like to see in my mind. These gave me the opportunity to be a director with lighting I like (because I lit it).
The above video’s were both created with AI from images I took of e-commerce fashion photography. The models reviewed the videos and consented to me sharing them
So, what are the laws?
The California AI Transparency Act states: Starting August 2, 2026,
-
All AI-generated content must include a visible “AI watermark” or label.
-
Violations carry fines, starting at $5,000 per offense.
-
The law likely applies to you if you sell products or have customers located in California.
The State of New York’s SB8420A states: Starting June 8, 2026,
-
All AI-generated content with a human generated in it and its purpose is advertising or marketing (a product or service), it must include a visible “AI watermark” or label.
-
Violations carry fines, starting at $1,000 for the first offense, $5,000 for additional offenses.
-
The law likely applies to you if you sell products or have customers located in New York.
What does this mean?
The New York law means that if your images are being used in social media, advertisements, on your website, in emails, etc. etc. that New York residents see, you have to label it to avoid the fine.
The California law is similar but has a later effect date.
Additional states such as: Colorado, Illinois, Texas and Utah are currently working on AI legislation that is similar.
So how will it be enforced? Will it be enforceable at all? That’s a tough one. For now, it seems like a small price to pay to lean more into working with photography & videography that isn’t AI created or just labeling that it is.
My two cents are this: AI has been coming hard and fast into the image making world. The excitement of its offerings as a low cost shortcut to high value images now are stained by the required labeling. False price comparisons on major product photography and video websites toted insane savings by creating with AI instead of people.
It seems like this is a trend anyway with often the people excited about AI are the ones who want to use it. The consumers of products are polling as leary of it and many brands are swearing it off in the first place.
Labeling the visuals protects that consumer and honestly, I think it should be extended beyond just when humans are in the images. I don’t mind letting people know the video’s I played around with are AI created. They stem from my images so they are based on real humans. Real humans who get to view each video before anyone else and approve or reject them. That filter feels fair to everyone involved.
Today’s project that I quoted was a quick one. A couple hours in studio still life e-commerce photography and a quick 2 hour on location product lifestyle shoot to round out their needs. He heard my rates and proposal and asked to book right away. He was replacing the AI images on his website.
Work with Kate
Working together doesn’t feel anything like work. Friendships are forged, jokes are told, songs are sung and by the end of the day you’ve forgotten you were there to make the unforgettable images you now have.
Consumer Packaged Goods Photographer Frida Baby
Lifestyle, Branding, Still Life & Ecommerce Photographer | Kate Benson
Frida baby vapor rub
- As a leading product photographer, Kate Benson’s engagement with Frida marked a significant milestone: the launch of their first comparative product placement campaign for a eucalyptus-based vapor rub.
- The initial phase of the product photoshoot focused on building a comprehensive image library, beginning with the required clean, white-background e-commerce shots.
- The product photoshoot quickly evolved beyond standard captures to include extensive creative development for social and online platforms, successfully executing the targeted ‘Smear Campaign.’
- Kate’s work as a dedicated product photographer supported Frida’s strategic goal to establish a strong visual presence for their innovative new product. Her freelance work with Frida brands as a client started 10 years ago in Miami when they created their first products and reached out to her to take their product photography.
Clean on brand e-commerce Product Photography
The initial phase centered on adhering to Frida Baby’s established e-commerce brand standard, characterized by a pure white background and subtle product reflection—a stylistic direction the brand later evolved from. Kate’s e-commerce product photography deliverables commenced with comprehensive, full-product captures, then strategically progressed to detailed macro-shots to highlight critical design elements, specifically the dispenser holes and the texture of the rub itself.


Elevated e-commerce photography
As a professional product photographer, Kate strategically advanced the initial e-commerce photography mandate. The subsequent product photoshoot phase introduced the deliberate use of Frida’s core brand color in the backdrops to enhance visual identity. She executed focused, elevated captures, utilizing a hand model to demonstrate the precise application and dispensing action of the product. A key deliverable was the creation of a ‘swipe image’—a textured visual asset—to clearly communicate the product’s tactile quality.


Creative still life in studio product photography
As the product photographer, Kate meticulously sourced botanical elements for evocative studio still life visuals. These narrative-driven images achieve greater resonance than conventional white-background photography. The still life style, a hallmark of the product photographer’s work, was often integrated into Frida’s branding shoots. This creative strategy successfully leveraged ingredient transparency into compelling visual content.


Lifestyle product photography
As a dedicated product lifestyle photographer, Kate constructed a bespoke set for environmental images. This allowed for seamless collaboration with the hand model on authentic, in-use captures. A client-requested changing table vignette was meticulously styled as a key scene. The shoot strategically incorporated other Frida Baby products to enhance the lifestyle context. This produced compelling product lifestyle photographs with an immersive, in-home experience.


The Smear Campaign
The targeted ‘Smear Campaign’ messaging was meticulously aligned with the product’s core value proposition. Visual assets were deliberately minimalist, incorporating significant negative space to optimize for downstream integration of compelling copy and call-to-action elements.


More final product photography use by Frida
The final imagery was leveraged across primary digital platforms. Assets were strategically deployed on their corporate e-commerce site and Amazon. High-volume wholesale partners, including Target and Walmart, utilized the photography. The visual content was integrated into comprehensive social media campaigns. The final image library facilitated expanded market reach and brand presence.


Sound like what you need?
Frida is one of many brands who chose to work with Kate for multi channel product photography needs. When a strong brand vision and consistency across the board is vital, using one well rounded photographer like Kate saves clients time and stress. That’s why so many folks end up relying on Kate month and month and year after year to handle whatever photography need comes up. Whether it’s product e-commerce photography, product lifestlye photography or studio still life product photography, Kate has you covered.
Work with Kate
Working together doesn’t feel anything like work. Friendships are forged, jokes are told, songs are sung and by the end of the day you’ve forgotten you were there to make the unforgettable images you now have.
How to get a Photography Quote
Bellow is a step by step process walking through how to organize your information to get a photography quote that will be accurate to what you need.
One of the things I am massively grateful for is that my website has a lot of organic leads and people contact me from around the world asking about photography. Not only does it provide opportunity to work with all kinds of businesses and meet lots of amazing folks, it also lets me take a peek at what are commonly asked questions. Often emails come in with messages that are quick and to the point:
“Can I get your rate for a photoshoot please?”
“How much does photography cost, I have a product I need photos for?”
It’s awesome to have anyone reach out for any reason, but the answer I give is always the same:
“I need to know a lot more about what you are asking in order to give you a quote that is even slightly accurate” Otherwise, I can only offer a day rate as a starting place. But I take smaller projects and don’t have a full day rate as my minimum, so even that is already inaccurate.
To try and assist folks, I created a quick step by step guide on how to get an accurate quote for photography (or any other visuals from an artist). I wanted to include that this applies to all kinds of visual creators as my author sister has pointed out that hearing me talk about what I need from people in order to get them what they want has translated to her illustrators who do her cover art and that when she implements these steps she has far less revisions and saves on her cover art design.
So here it goes!
Getting a quote for photography:
Step 1:
Identify your needs.
Start with a list of the photography/visual “holes” you need to fill. This can be anything from “a year’s worth of social media posts” to “product shots for each item we sell on our website” and “a full media package with all of the above plus ad campaign shots for advertisements and PR”.
Look at the following places:
- What do you need on your website: product photos, banner, category, & intro photos? etc.
- What do you need for social media?
- What do you need for print materials and what are they?
- What do you need for marketing materials?
- Where is every place you anticipate needing an image from this shoot?
Note where images can be used more than once from the above list
Step 2:
Identify your budget -if you have one. This will quickly control what you can and cannot afford to do. A lot of items will either be on or off the table based on this number.
Step 3:
Identify the creative direction.
If you don’t have a brand voice and vision yet, getting one ready before getting visuals creates a higher likelihood you’ll be using the visuals for longer. Ideally you will have visuals to review for your project. Ultimately, someone, somewhere along the way, will need to decide what the visuals from your shoot will look like. The ideal person to do this is someone who knows your company, your branding, your target market, and your budget.
Be as specific as possible. There are fabulous creative directors out there who can be hired to do this for you with your company’s branding. You can hire the photographer or visual artist to consult with you on this as well but it’s not a good idea to assume just hiring an artist whose work you like will result in images that connect with your customers/audience the way you need them to.
Try and be specific about:
- Composition and framing (horizontal, vertical, etc.
- Lighting/mood
- set/environment/studio setting
- Camera angle to subject
- props/additional items in each visual
- Talent with their desired interaction, specific appearance, etc. identified
Step 4:
Create the Shot List.
Combining the list of needs with the list of what each image should look like is called a “Shot List”. Handing a photographer a complete shot list will help the estimate they provide be accurate.
Visual artists will review the above info and estimate: how much time it should take to create the visuals? What the costs might be to make sure everything needed is available in the visuals? etc.
If the estimate comes back in and it’s out of budget, this is a great time to have a conversation that starts like this: “unfortunately, that shoot is out of our budget of $_____. What could be trimmed down/adjusted to get this into the budget for us? Here are our most important visuals we don’t want to cut ____(list most important items on the shot list)___.” -this is why at the end of step 1 you created a list of what can be used more than once. Reusing images are an easy place to cut shots and costs.
Conclusion:
Asking a visual artist to give you a quote without providing specifics like “how many images are you expecting?” and “what should these visuals look like” means you will have a quote for something that might not be what you want or need.
Your job is to identify & share with your visual artist what you need and what it should look like. That job can be hired out to someone who will be able to learn your company and assist in finding those for you.
Visual artists do have a style that you can see on their website but many of us don’t only create in those styles. We adjust our images to match what the client needs. Often our portfolio/website/instagram represents a blend of our work and a client’s desires. There is no guarantee that the visuals we deliver will match your expectations without you sharing what those expectations are.
Finding the right professional photographer through price comparison
Finding the Right Photographer: A Guide to B2B Photography Pricing
So, you’re on the hunt for a photographer? Awesome! Whether you need a photographer for product shots, lifestyle images, or something else entirely, figuring out where to start can be tricky. If you’re looking for a photographer for your business (B2B), it’s a whole different ball game than finding one for personal photos. Let’s dive into how to find the perfect photographer for your needs and what to expect when it comes to pricing.
Your First Step: Searching for a Photographer
When you start searching for a photographer, you might begin with simple terms like “photographer near me” or “professional photographer.” You’ll likely see a lot of B2C (business to consumer) photographers offering services like weddings and family portraits. While these are great, they’re not what you need for your business. This can lead to a lot of time spent sifting through irrelevant results.
Or, maybe you head to Instagram and start searching hashtags, hoping to find a content creator or influencer with the right style. While this can sometimes work, it can also be a time-consuming rabbit hole.
A Better Way to Find a Photographer
There’s a more efficient way to find the right photographer. Try these search terms:
“(Your closest city) (what type of photography you need) photographer”
For example:
- “Boston product photographer”
- “New Hampshire lifestyle photographer”
- “Portland Maine commercial photographer”
Replace “(what type of photography you need)” with terms like “product,” “lifestyle,” “advertising,” “commercial,” “ecommerce,” or “website.” If you’re not sure, just type in what you need photographed and see what comes up.
Pro Tip: Use Google Image Search! It’s a quick way to see photographer’s work without clicking through multiple websites. If you see images you like, then you know you’ve found a potential photographer to contact.
Understanding Photographer Pricing
Once you’ve found a few potential photographers, you’ll start reaching out for quotes. But here’s the thing: not all photographer quotes are created equal. You will get a range of prices and wonder why they’re so different. It’s like comparing the cost of chairs—are we talking about an IKEA chair, a Target chair, or a Restoration Hardware chair? Photographers vary just as much.
What Goes into a Photographer’s Price?
Generally, a photographer’s price includes:
- Time: How long the photoshoot will take.
- Cost: Expenses like equipment, lunch & coffee, studio/location rental, team/talent (models), props, and everything else you might see in the photo.
- Use: How you plan to use the photos.
Let’s look at these three types of photographers and how their pricing might differ
The Influencer/content creator:
They often have a price sheet based on the number of photos and reposts. Their style is what you see on their feed, so make sure it matches your brand. Ask about file sizes to ensure they’ll work for your needs (online, print, etc.). Their number of followers influences their price.

Above is a screen shot from Inbeat Agency which is a great article about the range of costs for a content creator.
The Big Box Photo Studio:
They might advertise a low price per photo, but extras like different shadows, retouching, props, creative direction, and more are extra. Those changes can add up quickly. Take a look at this price chart:

This price sheet is an example from a Big Box Photo Studio. It looks do-able if you want a single photo on a plain background, but if you need 10 photos you’re paying close to the same as you would with many Solo Professional Photographers but you have less creative control because it’s a Big Box Studio.
The Solo Professional Photographer (SPP):
They’ll likely ask a lot of questions to understand your needs. This is because they want to give you an accurate quote and ensure they’re the right fit for your project. They’re thinking about time, cost, and use to deliver exactly what you need. There’s no paying for BIG company overheads or them to post and promote your product so often this works out in your favor.
Which Photographer Should You Hire?
Each type of photographer has its place.
- Influencers/content creators can be great if their style aligns with your brand and you want a hands-off approach. Depending on their level of reach, this can be expensive.
- Big Box Photo Studios might work for simple, straightforward low number of photos, but watch out for those extra charges or when you have more than a couple images you need.
- Solo Professional Photographers often provide the best return on investment. They work closely with you, adapt during the shoot, and deliver high-quality images you can actually use.
In Conclusion
While photographer and content creators prices can vary widely at first glance, the price per usable image often evens out in the end. Consider what extra services you might be buying when hiring someone. More experienced photographers might charge higher rates but work more efficiently, while less experienced ones might take longer but charge less.
Finding the right photographer is about understanding your needs, doing your research, and choosing someone who aligns with your vision and budget. Happy hunting!
How to Make A Shot List for a Video and/or Photoshoot
Communication with your team is key to the success (or failure) of your photo and video shoots. One of the components that you should start with is the shot list. The shot list is a document of each photo and video clip you need. It’s also the answers to all the questions the team will have when providing you with a quote and executing your photo (and video) shoots.
Knowing that you need a shot list isn’t innate, and honestly, it’s not expected that every person who reaches out to me will know the significance of it and that one way or another, if we work together, we’ll have one. I happily build them for clients all the time. Usually after a meeting I get a clear picture of what most clients need and can start building one. Art directors, agencies, producers and many other industry people also build these for companies. So if it gets overwhelming know that you don’t have to take this on. You’ve got helpers who can converse with you and create this with you. Please feel comfortable to send me an email if you think you’d like to get some help. I’m going to cover a lot here!
Shot lists aren’t exclusive to any one type of photography or video. I build and use them for everything from branding images for companies looking to build portrait and lifestyle images of their team (for example, real estate firms, law firms, beauty spas, etc), to new restaurants, to products/still life, hopefully you get the idea! There is no shoot that doesn’t benefit from some type of a shot list. Even those really avant garde concept shoots that want to move unplanned and follow the whims of the day, will still benefit from a very basic and bare bones shot list.
Occasionally, new clients ask for guidance on what my ideal shot list looks like. Having the advantage of getting many different types, there are some that work better than others. Although that said, you can use any program you’d like (Excel, Power Point, Word, whatever), my favorite is Google Slides in Google Drive. Many of the benefits of Google Slides format translate to other programs (though not all, I love that we can tag each other in comments to ask direct clarification) and so I’m going to focus on it. It’s fairly user friendly and easy to drop screenshots of images into and have text to discuss it.
A thorough shot list will tell the team how many shots or clips are going to be taken, what the inspiration images are for each shot or clip, and any other important details.
To get started, let’s focus on two key factors: How many shots/clips are needed and what is your budget. These two pieces of the shot list puzzle will influence the rest of it. It’s helpful to make a note if either of these are flexible elements as the development of the shot list might affect how many shots/clips you can afford.
To determine how many photographs/photo animations/clips you need, I recommend starting with identifying where you have holes you are trying to fill. Look at all the places you need to fill:
- website banners & intro images
- social media (Instagram, Facebook, TikTok, etc)
- billboards
- TV commercials
- tradeshow posters
- emails
- magazine ads and articles
- product web pages
- etc.
Make a note of the dimensions of these images (square, vertical, horizontal) and if you need room to put text on the images.
You can deduce this by taking a look at what you are selling, do you have a bunch of products? Write down how many. Are you selling a service? Write down what it is and what is the message you are sending. Do you have one product but need multiple images? Same idea as selling a service. Asking yourself how many images you need and answering that question while noting if it’s flexible or not is where you start.
Next is your budget. You’ll want to know this before asking for quotes as budgets dictate what we can afford to do. There is always someone who will do what you are asking for whatever your budget is, but the quality of the project is affected by budget. It’s a rough feeling when I get the call from someone who tried to do a project with a vendor who didn’t deliver the quality they needed, forcing them to redo the project. Usually the quote is for more than the first vendor charged. I often wish I could give these folks the discount they sometimes request but it’s not possible when what failed to make the project successful the first time was cutting costs and purchasing/hiring lower quality team/props/etc. Skimping on these the second time might mean failure again. That said, I always look to find ways to adjust the shots needed to still get a client everything they need, while staying under their budget. And that is where the inspiration and details come in.
The inspiration images/clips are the guide that your team is going to imitate, (to some level). I hesitate to say imitate because usually these aren’t direct translations of what a client wants but it gives enough information to show your team the critical details that will influence your shoot, like:
- How many people need to be involved (models, actors, stylist, hair & makeup artists, assistants, grips, directors, etc)?
- What are the locations/sets?
- What are the props?
- What is the lighting/mood?
- What is the energy/vibe? (especially with talent in the shots)
Some of the above might have the same direction throughout the project. If that’s the case, identifying that at one point in the shot list works well. Make a single section with inspiration images or clips for any overall project instruction/direction and write out the details for it.

Above is an overall page from a shot list for a photoshoot that illustrated the coloring, poses and vibe a client was going for. After this was sent to me, we chatted about the specifics of what they liked about each image in there.
The goal of a shot list is to clearly share your needs with your team.
Here is an example of a page from a document I share with clients when they want a template to work with. It helps guide them on what to tell me and includes most of the needed details. The blank version and filled out version show just one way to communicate on a shot list.


Although very helpful, getting really clear like that isn’t always possible though. There are shoots that are more relaxed and where clients want the team to work along the lines of something but not be quite as specific and direct. And often for lifestyle or work with talent, we aren’t this specific. Especially when we shoot employees instead of models, keeping things a little more relaxed can be helpful to find the images that feel more natural. Something like this can work well in those situations:

When you are building a website though and want images to all feel consistant, the more direct the shot list is, the better.
This example is from a website rebuild I did and was taken from a product page. We had already decided on the color background so the images were our guide on the lighting and angles for each of the makeup palettes that needed pictures.

Collecting and organizing information like this will get you the most accurate quotes when you are asking photographers, producers, videographers, and all the team for estimates. It will also help the shoot day go smoothly and efficiently.
Once a shot list is created, there are usually some conversations to get further clarity, so don’t be taken back if that happens. Even the shot lists built by full time art directors can have holes in them still. Having someone come back and ask for a bit more detail is a sign you’ve hired a good person. It shows that crew member is deeply thinking about what you’re asking them to create.
Worth mentioning is that there are unlimited ways to build a shot list. Above are just a few examples. When I’m building for my clients I ask them to start a folder and collect images they love. If I’m being asked to create the list for them, I’ll do the same. Then we’ll share these images and toss any that we don’t think will work and put what does work into the document organizing it as we go. An organized guide is what a shot list is. Without it, you gamble that the people you hire will give you what you want. With it, you tell them clearly what to give you. One tends to produce better results than the other. I almost always have some version of this before I arrive on set. Usually it’s been shared with the client first and has been discussed and approved. The earlier on in the production of the shoot we have this the better the shoot results are.
Shelter-in-place leads to creative new work for Fridababy
Shelter-in-place leads to creative new work for Fridababy
I’ve been pushing my creative boundaries during Dallas’s shelter-in-place order. One of my favorite clients to work with is Fridababy. They have a lovely new art director who I’ve worked with at other companies that I’ve been collaborating with. This video is one of our creations from last month. Despite not being able to leave and work on location, I’ve been able to build unique sets around my house and studio utilizing whatever I can that is on brand to help build an image library for Fridababy. I’ve also been shooting their new product’s e-commerce photography for their website, Target, Buy Buy Baby and other stores that carry their line of clever and useful products.
The right time to have a baby.


The timing of having my daughter overlapping when it’s incredibly hard to actually shoot models has played out really well for Fridababy. I’ve been able to use her as a model for them between my still life photography. The whole family has been working together to keep her happy and get her to look at the camera. I’ve even been able to jump into a couple of the shots to get the moments they were looking for.

I’ve got long, thin fingers and as awkward as the rest of me is, my hands aren’t. So for a little over a year, I’ve been hand modeling products for my clients. This was another creative way I was able to help build the image library for Fridababy.

In addition to these specialty images (movement & models). I had quite a few still life in environment and in studio shots I took for them. The library needed more shots in places that felt real. So while homeschooling, chasing that baby, and working, I kept moving furniture around to different parts of the house to create sets. More than once that baby has made a mad dash for the wires and light stands that decorate the house these days.


Jewelry Photographer | Diamonds Direct Collection Photoshoot
2019 was a very, very exciting year!
More and more campaign shoots came in and it seemed the HUGE life changes of 2019 (like having another baby and moving to Dallas, TX) didn’t effect business. I think after I moved out of Miami to Charleston, SC I had to learn how to master the remote client photoshoot. We had already been doing it in Florida. But there are some products that it doesn’t work with and I was concerned how being a jewelry photographer would work out for me in Dallas and Fort Worth. Fine jewelry, high end pieces, really can’t often get shipped to my studio. So relocating and trying to maintain my life as a product and jewelry photographer was going to be challenging.
As fate would have it, one of my favorite jewelry clients didn’t miss a beat when I moved and quickly adjusted their plans to keep working with me. Diamonds Direct is known for their engagement rings and making it super easy to buy exactly what you want. Pick out the setting, pick out your diamond, and viola, your custom jewelry is ready. But they have so much more than that! After I moved, they reached out and asked if I could come and shoot their one of a kind pieces. From previous conversations, I knew these were different pieces then I had photographed before. I knew these were unique and rare pieces. The art direction was simple, plain white backgrounds with some clipping paths so they can drop the files into artwork as needed. However, the project and jewelry was anything but.

The jewelry photoshoot was over a couple days in an undisclosed location behind armed security guards. The collection isn’t usually all in one location so pieces were flown in from around the country for me to photograph. It was a huge responsibility to do justice as their jewelry photographer to these stunning necklaces, earrings, bracelets and rings. As is often the case with expensive jewelry like this, insurance regulated where the shoot would be. So I had to bring my studio to the location. Over the years, I’ve joked but the smaller the product is, the larger the studio setup we need! Every inch of the space they could give me to shoot was transformed with photography equipment. And in an organized furry we began capturing the collection.

Fast forward to a couple of weeks ago. I see I missed a deliver that required a signature. Usually I’m aware a package that requires a signature is coming so I was caught off guard by this. When I was able to catch the delivery and sign for it, the Collections book was waiting for me. Although my work is commonly used in print materials, it is rare for me to get to see it. A big thank you to the team over at Diamonds Direct for trusting me with the project and following through to the very end and sending one of their beautiful Collections books over to me. I love it!

I can only hope that this shoot was a preview into my new life as a Dallas jewelry photographer because if it is, many more great things are to come! Follow this link to see more of work from this (not so bashful but hopefully not too boastful) jewelry photographer.
Kate Benson Photography opening in Dallas Fort Worth
There have been big, (huge) changes over the last few months for me. The first update is we’ve expanded our family and welcomed a baby girl on July 1st! She and I are both doing great and the boys are adjusting to life with a baby wonderfully. While that has been going on, Sam (my husband) has taken a job in Dallas and been commuting back and forth from there to Charleston. The end of July will be our move to the grand old state of Texas which means I’ll be setting up shop there too!
Naturally, my travel will be limited for a while having a newborn. But I plan on still working as a local from Miami and now Charleston. That means I’ll still take on shoots of a full day or more without charging travel costs. Although, for the short term, that’s on hold until we’ve settled in and figured out the routine.
We’ve all fallen deeply in love with Charleston and life in the low country. And the friends we’ve made feel like souls we’ve know many times over. So leaving them is of course a bit of a heartbreak. But the next adventure is waiting and onward we shall go! As a side note, I expect we will be back often.
So if you wonder why I haven’t written in a while, the 50-60 hours a week of work, while in my third trimester, and finding housing halfway across the country (while getting my house on the market) and single parenting a 5 year old (who of course broke his elbow at the start of all this) has kept me away from an update. But I am so excited to share what I’ve been shooting. Some truly awesome clients and products have come through the studio and I’ve been blessed to get to take a lot of gorgeous shots. I look forward to sharing more soon! There will be some new galleries on the website as well as some exciting blog posts. So stay tuned!
And on that note, here’s a picture of a very tired mama with a very tiny new baby.

Jewelry photography Tips: How to improve your website photography | Professional Jewelry Photographer Kate Benson
You have just taken the first step in elevating your jewelry photography. Hopefully you will find some of these jewelry photography tips helpful.
They were written to speak to a wide audience so feel free to skip around if you like!
With your jewelry photography, you may be doing it yourself, or working with a photographer and not getting what you want. To get started, here is is a video of what a lot of jewelry photography looks like (although not how all professionals do it) and some of you may watch this video and say, “I would be happy with jewelry photography like that!” while others have had photography like that and are looking to elevate it.
Regardless of your situation, there are ways to help improve your images. You’ve put a lot of time and energy into designing your pieces, and you want your jewelry photographs to reflect that! Here are 8 tips from a professional jewelry photographer to help elevate your photos.
Tip 1: Have Your Pieces Professionally Polished and Cleaned
Before you bring your jewelry pieces to a photoshoot, make sure to get them professionally polished and cleaned. This will elevate your images because they will look almost new and flawless. When looking at a jewelry image, the camera is much closer to the piece than the naked eye would be. This means the image will show any scratches or flaws in the jewelry that otherwise would not be noticeable. Many of these blemishes a professional photographer can edit out in post production. However, keep in mind that your photograph cost is equal to how much time is spent on your products. If a photographer needs to spend a few hours retouching your images, then your per image rate will be more expensive than if you had your pieces cleaned and the photographer had few corrections to make.
Professional jewelers will be able to polish your jewelry and remove most scratches, too.
For example, when jewelry photographer Kate Benson worked with estate fine jewelry for Fine Art Auctions Miami, they would have their pieces professionally polished and cleaned before each shoot. These were mostly worn pieces from private collections. This helped to elevate their images as the product looked as good as it was going to before she photographed it. The images were requested to not be deeply retouched as the buyers needed to see the real state of the jewelry. So getting it well cleaned and polished was critical!
Tip 2: Don’t Wear Jewelry You Want Photographed Before a Photoshoot
Staying along the lines of getting your jewelry professionally polished and clean, is not to wear any jewelry you want photographed. It is tempting when you create a beautiful piece and have the chance to enjoy it yourself to put it on. However, wearing jewelry before the photoshoot exposes the pieces to risk that isn’t needed such as, scratching the pieces, fingerprints, dusts, etc. All of that will increase the likelihood of the pieces needing to be cleaned professionally or be subjected to more retouching.
If you are looking to clean your jewelry yourself, here is a video taking you step by step. Note: This process will not help to remove scratches.
Tip 3: Review and Carefully Select the Pieces You are Going to Shoot.
Manufacturing defects can happen. When picking out which pieces to photograph, check for everything. Some of the common issues that come through photography studios are:
- Crooked jump rings
- Loose stones that can fall out
- Scratches or dents
- Broken clasps
- Inconsistent assembly of pieces (for example, logo tags changing the sides of the pieces they are on).
By taking a close look at your jewelry and confirming the pieces are in the best shape possible you will save on retouching time. If you are working with a photographer, send more than one piece of the same jewelry to the shoot, so the photographer can pick out the best looking one.
Tip 4: Plan Art Direction for Each Image You Need Before Your Shoot
Whether you are building a website from scratch or creating an ad campaign, plan out every shot you need before shooting and make sure your pieces work for that shot. This is more important if you are working with a photographer but having things mapped out keeps each angle of each style piece consistent to how you want it to be. When putting images on a website you don’t want the angles of jewelry to shift. You want the website to look consistent and seamless. Having these guides will keep you from shifting what the images look like.
If you are working with a photographer, letting the jewelry photographer know what you want is crucial to getting the photographs you need. Map out with images (either through testing with your photographer or collection inspiration on you own) what images you like. The photographer will want a guide of how you want each shot she/he is taking to look (roughly). From there, jewelry photographers can have a place to start and offer suggestions of alternative options for lighting, angles, etc. where they see something might work better. Most photographers expect to have a conversation about this before the shoot. During that conversation, consider that a jewelry photographer has seen a lot of product like yours before and has an idea already of why some pictures work better than others. Take long chain necklaces for example. How far do you zoom out for your image to show such a large piece? Too far will not show the details of the necklace. A jewelry photographer might suggest either including a zoom feature on your website so customers can see those details clearly, or to add detail shots as secondary images of your piece.
Keep an eye out for future blog posts on how to create moodboards and shot lists for art direction.
Tip 5: Keep it Consistent
Regardless of if you are shooting yourself or a professional jewelry photographer is, use a tripod and make sure the jewelry isn’t shifting/moving around when it is photographed. For example, hanging necklaces might sway for a while, so either place something behind them or wait until they stop moving before shooting. Regardless of if you are using natural light or not, make notes about what the light values were. If you have studio lights, write down their values, positions, and modifiers. If you are shooting in natural light, record the time of day, the weather, etc. Light will change color when it is cloudy or sunny. You want to be able if you are shooting yourself to go back and recreate the setup you have next time you have new pieces to shoot.
If you have a professional jewelry photographer, confirm that he/she is taking steps to recreate your setup when you have more product ready to send. Product photographer Kate Benson had this to say on this topic, “Consistency is one of the reasons I don’t often select to shoot product in natural light. It can be a beautiful atheistic but after spending a decade working in South Florida where the weather changes constantly chasing the light values, temperatures, and adjusting modifiers to correct for clouds/sun slowed down work and created too many variables and hence, inconsistencies. I prefer to create natural light in studio now when clients want that look.” She explained that each client has their setups and lighting recorded through pictures and charts so whenever they send product again it will look like it was shot at the exact same time once it is on the website.
Tip 6: Matte vs. Shine
Jewelry is a finicky product to shoot. It acts like a mirror, reflecting everything. So what is reflecting in the metal is as important as what isn’t reflecting. Obviously you don’t want to see the yourself/the photographer and camera or objects from around a room in your jewelry but you may need to see something reflecting in the metal to make sure it looks right. If you have a matte finish on your jewelry you can get away with a lot more but when the jewelry has a shiny reflective finish then not seeing the right thing will look matte. Knowing how to put the right reflections into metal could make or break your sales + returns. If customers think they are buying a matte finish piece and get something shiny they could be very unhappy. So being accurate is very important. Pay close attention to what the jewelry looks like in your setup. You may need to add some reflections to make it look right!
Let’s revisit the first video about taking photographs using a light tent. A light tent is a great way to minimize any reflections. Your jewelry will be surrounded by plain white fabric on all sides, with the exception of a camera hole. The only reflection you’ll have is from your camera. It sounds counterintuitive, but the problem with a light tent is that you have no reflections. This gives jewelry a matte look, instead of the shine that looks great and gives pieces shape. Jewelry photographer Kate Benson has been shooting jewelry for over a decade, and she uses a variety of papers, scrims, modifiers, and lights (and almost never a light tent) to make the setup completely adjustable for each piece as necessary. “I have better control over the reflections in each jewelry piece this way. If I’m shooting rings that are different sizes, I can make small tweaks in the lighting setup to make each piece look its best. If I just put one on after the other, and didn’t make any adjustments, the reflections could look wrong.” Here’s an example of a piece of jewelry shot in a light box versus a controlled studio setup.
Bracelet shot using a light box by anonymous photographer
Bracelet shot in studio with a custom lighting setup by Kate Benson
Tip 7: Test it Out
There is a rumor that Vogue Magazine makes 5 different covers for every issue and then sends those covers out to a group of design talented beta viewers who will vote for the cover they like best. Regardless if that is true or not, that concept is a great way to elevate your jewelry photography. Whether you plan on using the photographs on your website, in mailers, or for banners and billboards, creating a few different mockup versions and seeing which ones look the best is sure to improve your photography usage. If you have a single piece, try seeing if your jewelry photographer offers a test shoot option where you can hire her/him to explore a few different photographic options to see what works the best.
Tip 8: When in Doubt, Hire a Professional Jewelry Photographer
This is probably the fastest way to improve your jewelry photography. Keep in mind, hiring a professional photographer is not the same thing as a professional jewelry photographer. True jewelry photographers will pay close attention to what your jewelry is, what it needs to look like, and will make sure it all translates beautifully in the photography. You can estimate the per shot rate from a professional jewelry photographer in the range of $30 – $80+, which is extremely dependent on what type of jewelry you have, and how many pieces. If you have a ring that you sell with different colored stones on it, it might be possible to recolor the stones, and you might be looking toward the $30 range. If you have fine jewelry that needs a specific lighting setup per piece, you are looking at the higher end of the spectrum. Jewelry photographer Kate Benson recently did a shoot for a client with a high volume of images needed for the brands website and Amazon and was able to get the photography for under $20 a shot with testing because the volume was so high.
Many professional jewelry photographers will not give you this per image rate, but instead quote you based on an hourly or day rate. This way, they have the time they need to get your pieces to look stunning. A lot of work goes into a jewelry photo, including initial prep (like extra polishing), styling (especially difficult with chains), test shooting (if you needed it ), shooting (and lighting adjustments as needed), then retouching. If you receive a per shot rate, confirm that you know the final photography you are getting includes all the elements you need. Make sure every part of the shoot is spelled out before they do the work for you. The last think you want is to hire someone to do a shoot for you and then realize you needed background cleanup, more retouching, clipping paths, custom file sizes, etc. If you hire an hourly rate photographer you can always go back and ask for these things and they can invoice for them after but if you have a per shot rate this might not be included. Over communicating to the photographer is better than under communicating! It takes time but is worth it to avoid any issues later!
In conclusion
There are many factors that can increase your chances of getting the best jewelry photography for your brand. Be confident in what you decide to do and remember that if you try one way and it doesn’t work, you can try something else. Leave any questions you have in the comments and Kate Benson will get back to you ASAP!
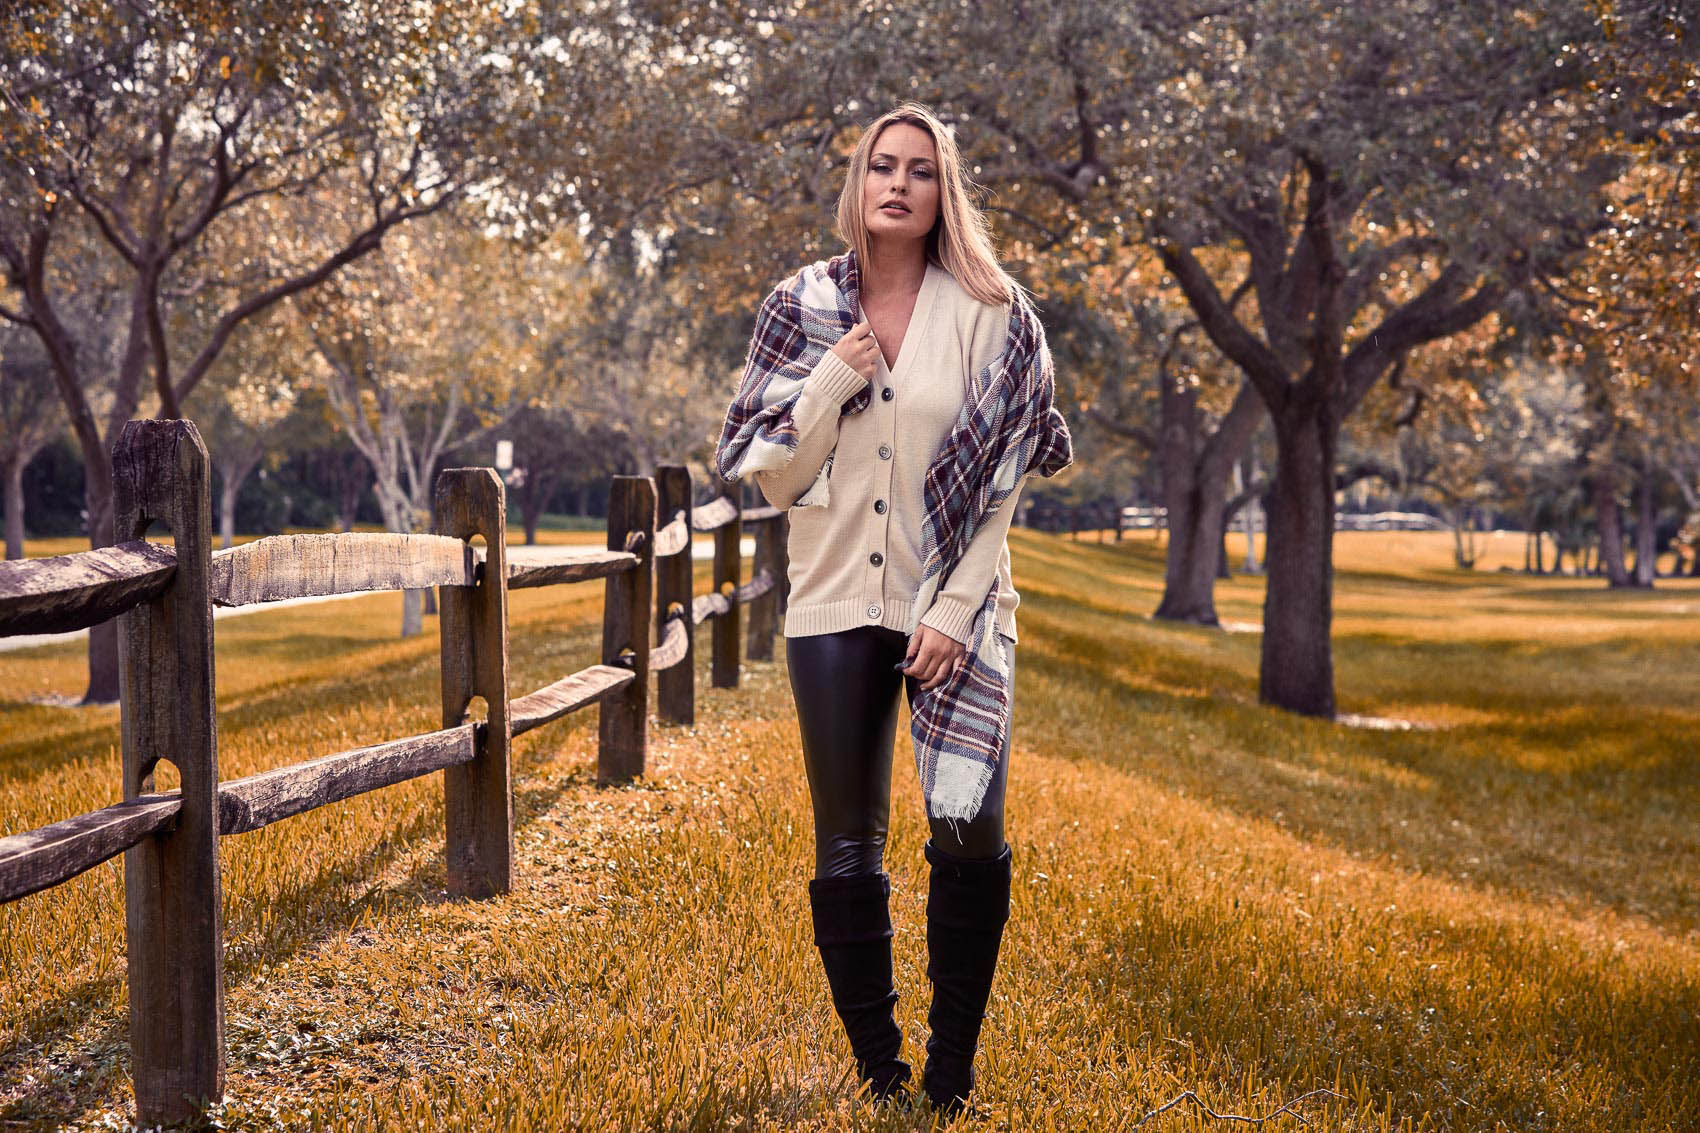
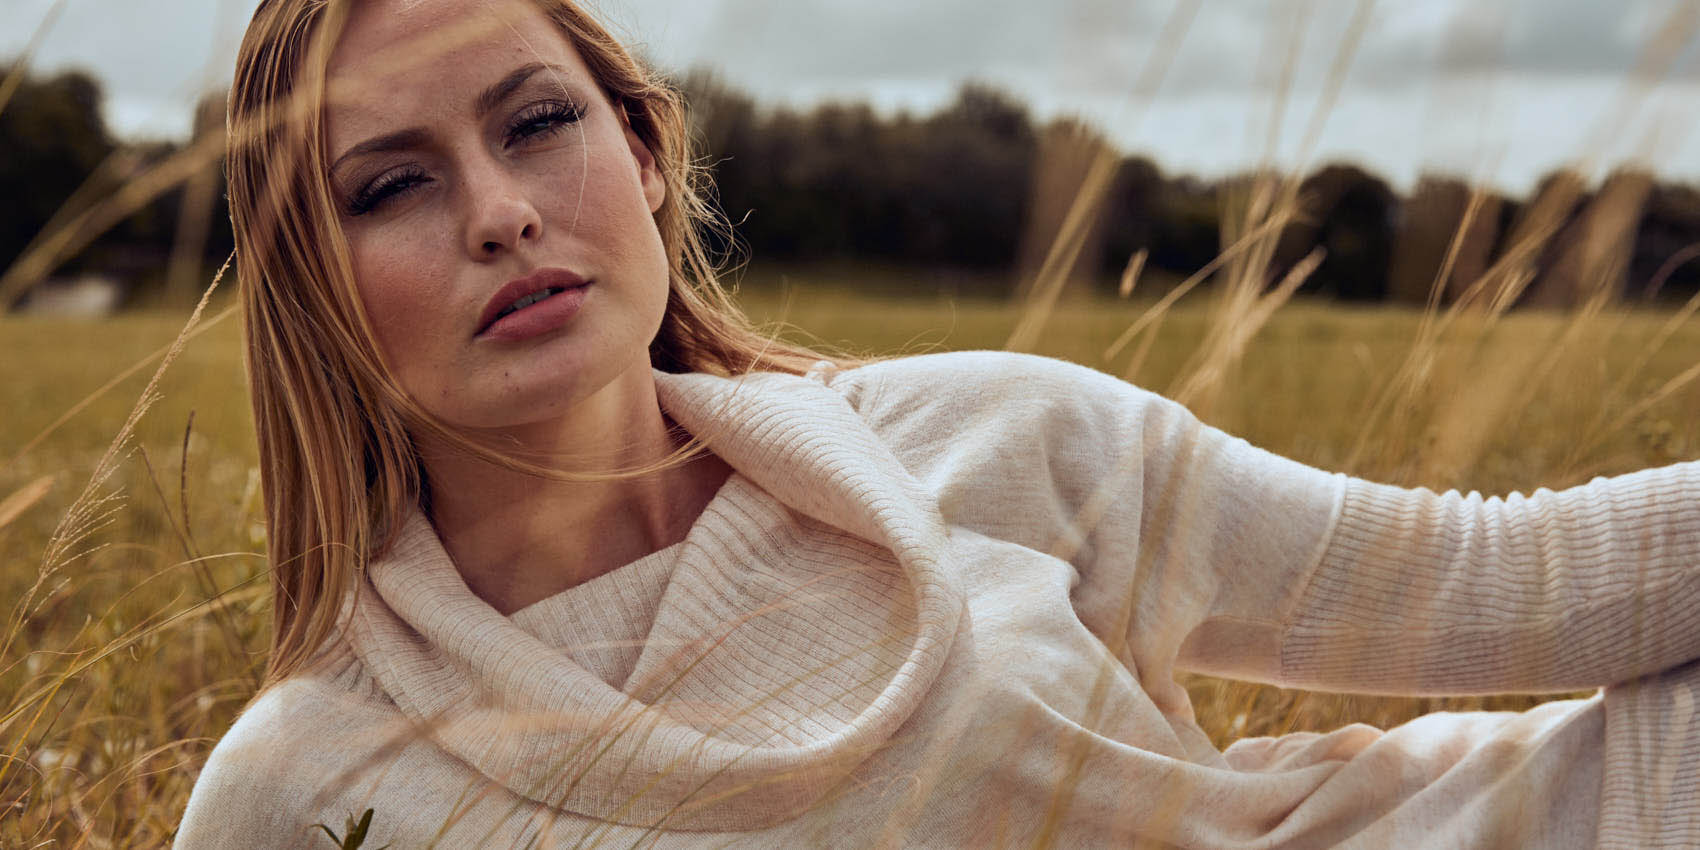
Lifestyle, Product, and Fashion Photographer | Shooting in a hurricane | Carolina, Florida, Georgia

Am I a storm chaser or fashion photographer? Sometimes, a little of both.
I was expecting a pretty standard photoshoot last month as I headed to South Florida from Charleston. I got to my dad’s place where I was crashing for the night and he broke the news that there was a storm brewing off the West coast of the state and said I should keep an eye on it. Nine years of living in Miami plus three in South Carolina has given me more than a small number of brushes with nasty storms, and this one looked to be staying away from where I was shooting so I shrugged it off. I went to bed and early the next morning headed off to the first day of shooting as the fashion photographer for InnerShine, my client.
The shoot had some inherent surprises waiting for me once I arrived. InnerShine needed a fall looking location. We were in South Florida. So that meant we needed to work around anything tropical and to get some of the super saturated green color out of the shots since South Florida is basically a jungle (if you haven’t been there). With careful angles and location choices (including sketching out one civilian who couldn’t figure out why there were models in the bushes in front of his home) we created fields of fall grasses and oak trees with leaves changing for the new season.
Another challenge (which is a common one in South Florida) was keeping the models from getting too hot. It can be easy to overlook that this responsibility fall on the fashion photographer but it does. The fashion photographer is the person on set seeing the models closer than anyone else. The girls were wearing sweaters and jeans so as often as possible we gave them flip flops, AC (in cars between shots), and water. Lots of water. Red ant bites, mosquitos and iguanas didn’t stop these girls from bringing their best and both Anna Julia Hagen and Valerie Vigoreaux (both with Wilhelmina Miami) showed me again why I love photographing them so much.
As we wrapped up the first day of shooting, everyone was thrilled with how we all came together.


What is the opposite of a rain dance?
Everyone was thrilled with the images from our first day of shooting. And to be honest, I was wrapped up in the images and production of getting ready for a big second day. Tired and wanting to be on my A game, I crashed early. The only time I looked at my phone was to make a good night call to my family.
Waking up early, my assistant Chelsea and I got straight to work. The day started with some in studio e-commerce fashion photography which we flew through (if you’ve worked with me shooting on model e-commerce in studio, you know I don’t mess around and we move fast). Then we had a quick lunch and I put my fashion photographer hat back on and we started loading our cars to head off to a field I scouted the day before. As models, clients and team loaded everything into the cars, the sky opened up and it started to pour. My fathers words of caution came straight to mind. These were the outer bands of the hurricane.
Ever have that feeling that everyone is staring at you? Waiting for you to do something and you know that there isn’t anything you can do? It was a lot like that. With everyone sitting in their cars, I could still feel all eyes on me despite the way the rain distorted everything. Was it a mistake to not check the weather? Nope. It was not. In fact, outer bands are something we can work around. There are brief downpours with big gusts of wind and then, nothing. So in the calmest manner possible, I waved and started to drive to the location. Letting everyone follow despite their worry.
The drive to the location ate up most of the time the outer band was over us. The field was wet but we brought blankets and we stacked the scrims under them so the models wouldn’t get wet as they sat in the field. And then that insanely beautiful “it just rained” light started. I began firing away. Quickly switching models and sending the other back to change, over and over, throughout different parts of the field I captured moody, beautiful photo after photo.


It was the perfect storm, for photography.
Not once did I mention these were hurricane rains and winds we were dodging. Not yet. Being a fashion photographer is very intuitive and it’s not unusual to get into a zone where you can feel the models energy and they can feel yours. They are able to give you what you need often without words as they watch and ready your subtle changes in body language and expressions, and vice versa. It’s a beautiful dance when you connect with each other to create art in this way. And these girls were rock stars, reading what I needed from them and giving it. I did the same, connecting to them, seeing the shots and angles and of course noticing the small clues that told me I had just a few more shots and then I was going to need to switch models or our weather was about to shift for the worse.
The lighting was constantly changing. The clouds were moving so fast and so varied in thickness the light would drop and then bounce back up and I was playing a great game of catch with it. Making sure it didn’t throw me a curve ball that I couldn’t lock in on and still get the shot. I have to give it credit though, such dramatic shifts in light created a lot of different image opportunities.
The dark stormy setting took some of that saturation out of the greens, it allowed for the field to become a place that could be anywhere. Wrapping blankets around the models and scarves added to the fall setting that the weather so graciously helped create for us. When I finally wrapped the shoot, after we had traveled to some stone walls away from the field, I finally told the girls they may want to walk a bit faster back to the cars since it looked like the next bit of the hurricane was going to rain on us again. It was quite a surprise to the whole team that those windy rain squalls that were popping up were just the tip of the iceberg. They were in disbelief that this was a hurricane until checking for themselves. Two days later Hurricane Michael would make catastrophic landfall on the panhandle.
As I drove home the next day, with a bit more traffic than usual since evacuation orders had been issued, I hit some nasty spots. Tornado warnings kept coming through my assistant Chelsea and I’s phones. She tried to be calm and let me focus on what little bit of road I could see ahead of me. These were just the outer bands as well. Despite making lemonade out of lemons, I have to admit we got a little lucky. One day later and we might not have been able to shoot. What a difference a day can make. It’s shots like these that are why I am also a lifestyle and fashion photographer and not just solely shooting product. These magic moments create surprises that I would never want to stop getting.