Miami Product Photographer | Photoshop – A Useful Tool, Not Divine Intervention

Post-production of photos is extremely important in product photography. In this blog, we will examine Photoshop and its uses and misconceptions.
What Photoshop is NOT: Photoshop is not divine intervention to airbrush your photo and make it suddenly incredible. There is a common misunderstanding that by using Photoshop, any photo can magically become amazing. This is most definitely not true.

What Photoshop IS: Photoshop is a wonderful tool that can help make great photos even better by modifying certain facets of the photo.

It is crucial to begin the post-production with an effective photo that conveys a compelling story relevant to the product. The old saying “garbage in – garbage out” is a very basic way of saying that if you begin with a poor photo, no amount of Photoshop in the world will be able to make that photo great. As a photographer, I do not cut corners during the shoot. I take my time and focus my energy to create the best photo possible. I am then able to enhance this photo with the various tools available in Photoshop.

Here is a list of things that Photoshop cannot fix, taken from the blog “Six Things You Can’t Fix in Photoshop,” by Shutterfinger:

  1. Camera position – if the camera is too close to the product, it is impossible to “back it up” in post-production
  2. Lighting direction and quality
  3. Focus
  4. Blurred image due to motion of the camera or subject
  5. Lost data
  6. Lack of creativity/spark/intent

Miami Product Photographer | Raw Image Files – Better Known as “Digital Negatives”

The term “raw file” is often mistaken or misunderstood. Nowadays, with everyone taking photos on their phone and sharing them with the world, the idea of a digital photo seems relatively straightforward and easy to comprehend. But that is not really the case. If you don’t fully understand the difference between a raw file, a processed file and a retouched file, don’t worry, you are not alone! This is a common issue that I hope to clarify here.
It is essential to distinguish between these three terms (raw files, processed files, and retouched files) in order to get exactly what you need and can use from a photo shoot. Sometimes clients will ask me for the raw files from the shoot when they actually meant to ask for the processed files (they want files that have not yet been retouched, but that are in a format that they can use).

So let’s start with the basics. First of all, it is important to know what a raw file is. Believe it or not, raw is not necessarily what you think it is. Many people think that “raw”simply means that it hasn’t been re-touched or edited using Photoshop or a similar program. This is not the case. To clarify, a raw file means “camera raw.” But what does this mean exactly?

Consider this: years ago when you wanted to shoot photos, you had a roll of Kodak film, for example. You placed the roll of film in your camera and began shooting. After you shot all 24 or 36 photos on the roll, you would typically take the roll of film to a photo center to have it processed. The roll itself was no good to you until it was processed. What you got back from the photo center was the developed film (as negatives or slides) and prints (if you opted to print them). In terms of the digital world of photography, think of the raw files as the undeveloped roll of film that has been shot, the processed files as the developed film and the retouched files as the prints that you would get.

Part of the reason we shoot tethered (with the camera attached to the computer by a cable in order to send the files directly to the computer) is so that we can show the client a preview of a processed file that doesn’t actually exist in reality yet. It hasn’t been processed at this point, but it can be viewed as if it were. Shooting tethered is a great way to give the client a general idea of what the photo is going to look like when it is processed. If I were shooting to a CD or memory card, you would not be seeing the hypothetical version of the image. You would be seeing the raw version which is hard to understand unless you know how to read them.

So, after the raw images are shot, they need to be processed. Clients hire me because they like my work and part of that work is file processing. It is the part of post-production that occurs after the shoot, where I make sure that when I give you the files, they look exactly like they are supposed to. In the past, when using film, photographers would shoot photos with the idea in mind of how we were going to process it. Pushing or pulling the film during the development process was a way to adjust what we shot in order to create the best image possible. Now, with digital images, this is done in the “digital darkroom” or in the processing phase of post-production. Some of the things that can be done during processing are (from: http://en.wikipedia.org/wiki/Raw_image_format):

  • decoding – image data of raw files are typically encoded for compression purpose, but also often for
    obfuscation purpose
  • defective pixel removal – replacing data in known bad locations with interpolations from nearby locations
  • white balancing – accounting for color temperature of the light that was used to take the photograph
  • demosaicing – interpolating the partial raw data received from the color-filtered image sensor into a matrix of colored pixels.
  • noise reduction – trading off detail for smoothness by removing small fluctuations
  • color translation – converting from the camera native color space defined by the spectral sensitivities of the image sensor to an output color space (typically sRGB for JPEG)
  • tone reproduction – the scene luminance captured by the camera sensors and stored in the raw file needs to be rendered for pleasing effect and correct viewing on low-dynamic-range monitors or prints
  • compression – for example JPEG compression
  • removal of systematic noise – bias frame subtraction and flat-field correction
  • dark frame subtraction
  • optical correction – lens distortion correction, vignetting correction, and color fringing correction
  • contrast enhancement
  • increasing visual acuity by unsharp masking
  • dynamic range compression – lighten shadow regions without blowing out highlight regions

And after the images are processed, they are typically retouched.  Retouching is a digital way to make your photo look even better. Sometimes, in order to produce the best shot, you have to shoot multiple images and put these images together into one photo. This would occur in the retouching phase of the post production work. Jewelry photography is an excellent example of this.

So, as you can see, just as in the days of “old school” film, digital photography involves multiple steps that all lead up to the final, usable image. And hopefully this clears up the difference between a raw file, a processed file and a retouched file.

If you are still a little confused, here is another photographer’s explanation

Click here for more info on Miami Product Photographer Kate Benson

E-commerce Photographer Miami | Kate Benson | Client Feedback

After our shoot with Jennifer Belcourt, the owner and designer of Zacasha, I received a wonderful email thanking me. Jennifer had previously expressed to me how difficult it was at times to convey her wide-ranging ideas and how sometimes people became frustrated with her because she is an extremely artistic thinker.
This is an excerpt from her email:

 “Shooting with both of you was honestly a real moment of pleasure, in total peaceful creative harmony between us! Even though, when it comes to my artistic way of expression, I am so crooked in my mind and often scaring or annoying people around me, I never had this feeling with you. Thank you so much. I respect your work a lot and that you commit heart and soul to your shooting with us. Even committed your arm muscles, Lol! You totally dedicate yourself to your work and have an amazing balance between creating and staying focused!!!!
Thank you so much , I am so glad we met! I love your pictures !!!!

Big big kisses,
Jennifer”

It was a true pleasure working with Jennifer and translating her ideas to beautiful photos. We are thrilled that she was so happy with how well the shoot went.

Advertising Photographer Miami |Kate Benson | Donald J. Pliner Shoot

Daniela, a model I worked with years ago, contacted me recently requesting high resolution files from a shoot we did for Donald J. Pliner back in 2011. I spent some time looking in my archives, searching for the exact images she wanted. It was a lot of fun revisiting old photo shoots from years past. Thankfully I am organized in my file-naming, so it didn’t take too long to locate the photos she needed. Here are some of these images:


I also came across this cool group shot that was used in a general marketing email blast for Donald J. Pliner:

E-commerce Photographer Miami | How to Produce a Professional Photo shoot, aka “What the heck do I do now?”

Everyone has to start somewhere. Chances are good that if you are reading this blog, you are wondering what the heck do I need to do to produce a photo shoot? It’s OK! No one will tell! In fact you can message me with any questions you might have. My goal is to help my clients or anyone who finds themselves needing to produce a photo shoot. Ready? Here goes!
When planning a shoot, there are a multitude of things to consider in order to make your shoot successful. As the saying goes, “The devil is in the details.” Here are ways to plan out those details to make for a successful shoot. While this is a list of important items to keep in mind, the descriptions are purposely broad with some specific examples given; your distinct needs for your shoot will require you to refine, add and/or subtract items as necessary.

Some of the very first things to take into account are your budget, due dates, the shot list, and usage. Identify the budget for the shoot, and determine how rigid it is. This will help shape the decisions you make regarding the entire production. How much flexibility do you have if unexpected costs come up? Due dates are crucial to keep in mind. When are the images needed? Understanding your time frame will allow you to work backwards in creating a schedule. A shot list is also imperative. Brainstorm what photos you will need. Does your product need to be shot on-model and/or still life? Do you need various angles of each item? How many total images do you need of your product(s)? And don’t forget to keep in mind the usage. How will your photos be used? For advertising? Internally? On the web?

The next thing to plan is the art direction. This is something that can be done in-house or outsourced, but is a significant aspect of your production. Art direction involves sourcing inspiration for your photos (I suggest collecting visual examples for this), making sure the photos line up with your company’s image, and ensuring that the photos convey the mood and environment that you want your product(s) to have. And, of course, this all dictates the type of photographer that you will use. You wouldn’t choose a nature photographer for an action shot of a model, for example. Which leads us to the casting…

Your next step involves casting and determining the details of the actual shoot. Your casting may include hiring models, stylists, hairstylists, makeup artists, and, of course, the photographer (to name a few). You may also need to hire a professional retoucher for post-production. Some photographers can do their own retouching, but it is important to determine whether they can do it well. You then need to ascertain whether you will be using a studio or a location for the shoot. If you plan to shoot on location, you will need to obtain permits or permission to use the site, and you should have a back-up plan in case of weather issues. You also need to consider your set. What inanimate objects will you need to complete the shot? What wardrobe or accessories might you need for the models? Is a manicure necessary due to close-up shots of a model’s hands?

Within the location details (whether on location or in studio) it is essential to plan food and beverages for everyone at the shoot and possibly transportation to and from the site. You may even need to provide lodging for the clients, models and/or the crew, depending on the location.

Image selection is an important part of the process. This can occur either on set or after the shoot. If the photographer shoots tethered to a computer, you can see the images immediately as they are shot. This gives you the opportunity to select your images while on set, and it also allows you to confirm that you have everything you need before the shoot is done.

After the shoot has taken place, there is still work to be done. The post-production work includes file management (naming, re-sizing, and delivering the images as digital files), as well as any retouching that may be required. When budgeting for your shoot, it is important to determine whether these costs are built into the photographer’s fee or will be charged additionally.

After taking all of this into account, the big question is can this all fit into your budget? If the answer is no, it is time to re-evaluate some aspects of your plan. Can you get a higher budget? Can you be more specific in your usage? Can you reduce your shot list? What can be done in-house?

And lastly, don’t forget about payment. When are people expecting to be paid? How long will it take your company to pay?

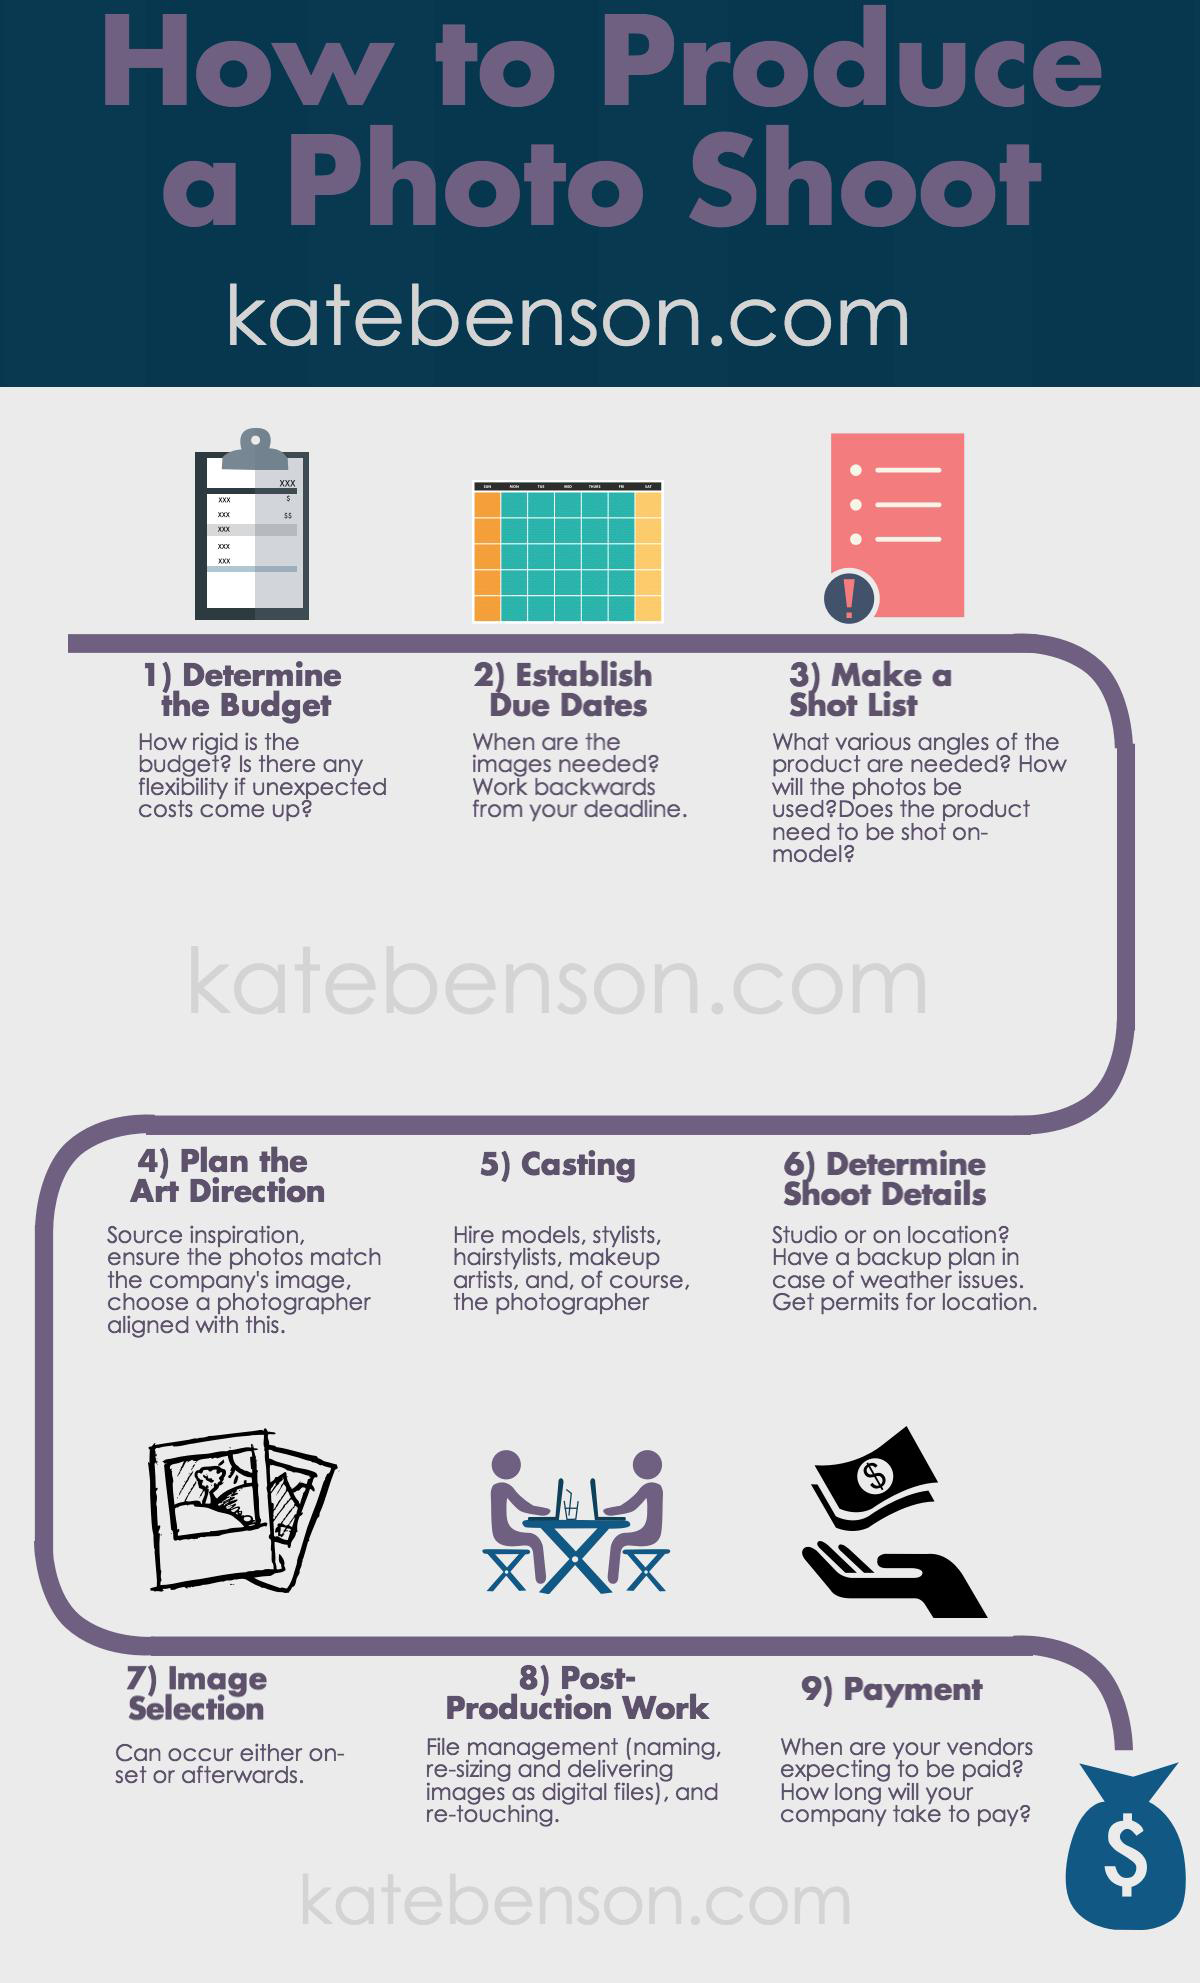
So, here is a quick checklist to help you plan your shoot:

budget
due dates
shot list
usage
art direction
casting
shoot details
location details
image selection
post-production work
payment

Just remember, this is a list of important items to keep in mind, but the descriptions are broad. You will need to tweak the list depending on your own needs for your shoot.

Here is a handy flowchart for your reference:


Subscribe To Our Newsletter

Join our mailing list to receive the latest news and updates from our team.

You have Successfully Subscribed!